
Main Window
Purpose
The NEM Configurator dialog is the part of FOXMAN‑UN that deals with the setup and configuration of the management network as well as all managed objects. It is also used to configure the access rights of its operators / users.
In addition the NEM Configurator provides access to alarm information and to configuration on a single NE basis.
The dialog window consists of three areas:
Tree panel on the left | The main elements of the FOXMAN‑UN system in hierarchical form. Each FOXMAN‑UN server contains Domains, Agents, Maps, Foreign Objects, SNMP Security Profiles, Users, and User Security Profiles. Each item in the tree panel likewise has the following menu to show or hide their members: - Expand: shows the members of the selected item in the tree panel. All lower levels of the selected item are expanded simultaneously. - Collapse: hides the members of the selected item in the tree panel. All lower levels of the selected item are collapsed simultaneously. Note: The members of the selected item can likewise be shown/hidden by clicking on its node symbol or double clicking the item in the tree panel. |
Details panel on the right | All members of the item selected in the tree panel. The set of attributes to be displayed for each member can be configured (see under “Dialog images”). Not applicable attributes are shown with gray background. |
Event list at the bottom | A list of the main events for the current session, with user, FOXMAN‑UN server, date/time, and action description. The last 100'000 events are kept in the FOXMAN‑UN database and can be browsed through via the Event List dialog. |
The following tab sections are available: NE Browser, Role Based Access Control. The desired section is selected via a tab above the tree panel.
NE Browser | Allows creation and configuration of Domains, Agents, SNMP Security Profiles, and Foreign Objects. Domains are basically part of Security. In the NE browser context they are used to show the NEs they contain in the details panel. Agents control the management communication to the NEs, their members are therefore the NEs. Map displays the maps created via the NEM Network Browser. Foreign Objects are used to include third party equipment in the network management. SNMP Security Profiles define the security parameters and are assigned to each SNMP network element. |
Role Based Access Control | Allows creation and configuration of domains, users, and roles. - Domains: can have all types of elements as members. All members are displayed in the details panel. Also see Domain – Create, Domain – Choose Members. - Users: can be created and assigned access rights to the different FOXMAN‑UN function categories on a per role basis (new, RBAC, also see Context menu in tree panel and commands for tab “Role Based Access Control”). - Roles: is divided into system roles and user-defined roles. There are some predefined system roles (Viewer, Operator, Engineer, Installer, Secadm (Security administrator), Rbacmnt (RBAC management)). The user-defined roles are to be added, edited or removed by a user with appropriate permissions (full access permission to RBAC, or nemsec user). |
Please note:
The columns to be shown in any of the tables of the dialog window can be configured. To hide or show columns, right click anywhere on the table header and set or delete the marks for the listed columns, or click “More…”.
The top right hand corner icon ||| of a table is used for Export and Print options.
Dialog images
NE Browser
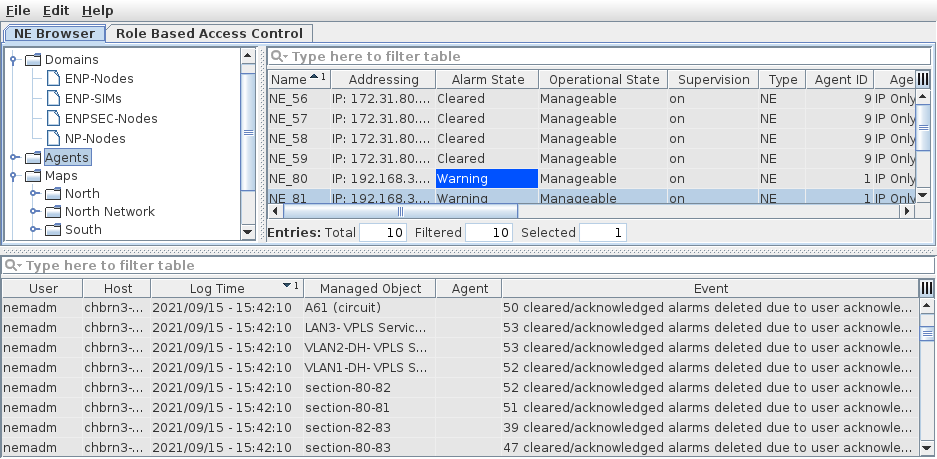
Also see “Context menu in tree panel for tab “NE Browser”” further below.
Role Based Access Control
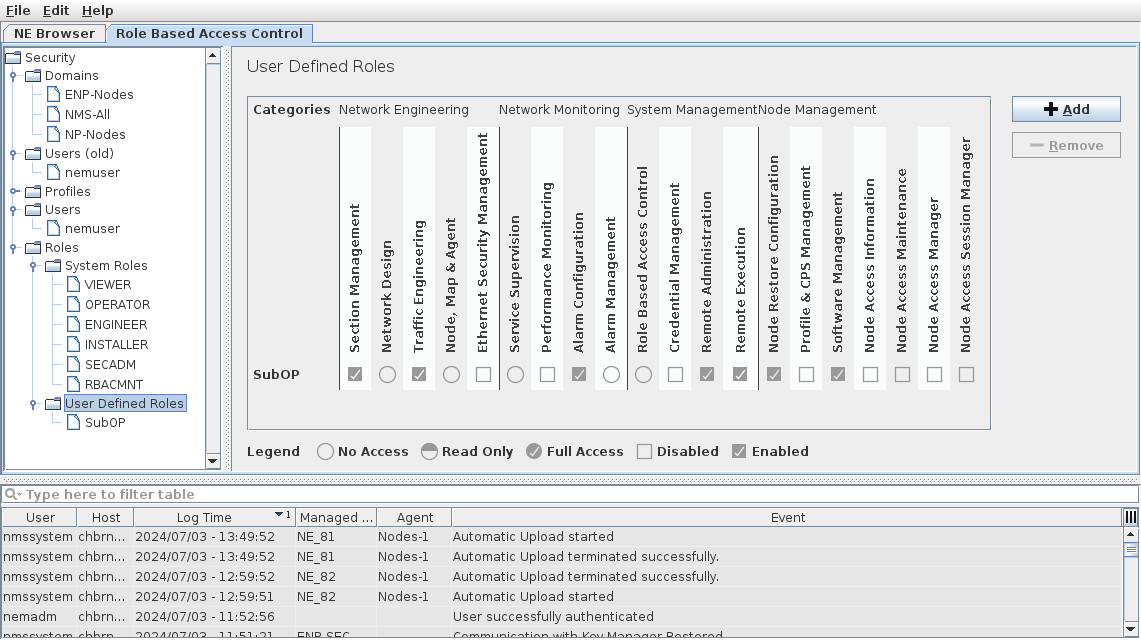
Also see “Context menu in tree panel and commands for tab “Role Based Access Control”” further below.
Mandatory entries
Not applicable.
Optional entries
Not applicable.
Informational content
Details panel | Depending on the selection in the tree panel, the details panel shows a list of the appropriate elements with their attributes. The attributes to be displayed can be configured (see Dialog images). |
Controls (buttons, menu items, etc.)
Main menu
The following describes the available sub-menus for each item of the main menu.
File
Exit | Terminates the NEM Configurator session. |
Edit
Options | Calls a dialog where the global Alarm Forwarding and the Alarm Escalations control and behavior can be enabled or disabled. The parameters for the alarm forwarding are set on a per domain basis in the Domain – Create and Domain – Properties dialogs. Only a NEM administrator is authorized to change the setting. |
Help
? Help | Calls the FOXMAN‑UN help viewer and opens this page. |
Context menu in tree panel for tab “NE Browser”
The following describes the menu items available after placing the cursor over an item in the tree and clicking the right mouse button.
Domains
Item “Domains” in the tree selected:
Create Domain | Allows adding a domain; see Domain – Create. |
Any existing domain selected:
Allows configuration or modification of the selected domain. A domain contains a selection of all FOXMAN‑UN elements, including domains. These elements must be created before the domain can be configured. | |
Delete Domain | Removes the item from the FOXMAN‑UN database. |
Agents
Item “Agents” in the tree selected:
Allows adding and configuring an agent which will handle the management communication to the NEs. Note: The FOXMAN‑UN user’s newly created Agent is automatically added to the Domain it has access to. E.g. FOXMAN‑UN user “operator” has access to Domain “south”. When “operator” creates a new Agent, it will automatically be added to Domain “south”. |
Any existing agent in the tree selected:
Suspend Agent Run Agent | Suspends the communication from the agent to all its associated NEs. The agent status in the tree changes from “Running” to “Suspended”. The context menu item is changed to “Run Agent” which enables the communication again. Note: Starting many agents controlling many NEs each at the same time via “Run Agent” – e.g., after applying specific changes to the network and/or NE configurations – may have an important impact on system performance and might cause considerable delays in loading configuration changes and alarms from the network to the NEM database. It is therefore recommended to stagger reactivation of several agents over time. |
Allows changing one or all parameters of an existing agent. | |
Calls the Create NE dialog where an NE can be assigned to the agent. If the agent can establish communication to the NE, its configuration and inventory are automatically uploaded and stored in the FOXMAN‑UN database. Note: The FOXMAN‑UN user’s newly created NE is automatically added to the Domain it has access to. | |
Finds all existing NEs in the specified address range. They are given a unique name and are assigned to the agent. Note: The FOXMAN‑UN user’s newly discovered NEs are automatically added to the Domain it has access to. | |
Cancel NE discovery request… | The menu item is only active if one or several discovery requests are being processed. It calls the “Cancel Discovery” dialog where a specific discovery request can be selected for cancellation. |
Delete Agent | Removes the agent and all its associated NEs (nodes) from the FOXMAN‑UN database. |
Agent Statistic | Calls Agent Statistic dialog |
Maps
Item “Maps” (root node) in the tree selected:
Displays the alarm summary showing the currently active alarms per severity, of all the NEs and FOs contained in all maps or groups | |
Displays the alarm list containing the currently active alarms of all the NEs and FOs contained in all maps or groups |
Item “map node” in the tree selected:
Opens the selected map directly in the Network Browser’s map. Likewise the map’s Alarm Summary is displayed. | |
Displays the alarm list containing the currently active alarms of all the NEs, FOs, and system objects contained in this map and in all of its groups and subgroups. |
Item “group node” in the tree selected:
Displays the alarm list containing the currently active alarms of all the NEs and FOs contained in the selected group and all its subgroups. |
Item “system node” in the tree selected:
Displays the alarm list containing the currently active System Alarms. |
Foreign Objects
Item “Foreign Objects” in the tree selected:
Allows creating and configuring a Foreign Object which represents third party equipment within FOXMAN‑UN. |
SNMP Security Profiles
Item “SNMP Security Profiles” in the tree selected:
Creates an SNMP Security Profile that can be assigned to a SNMP NE during its creation. |
Context menu in details panel
The following describes the menu items available after placing the cursor over an item in the details panel and clicking the right mouse button.
NE (Network Element)
Applicable to the NEs of the family FOX51x and for the Windows®1 based NEM client only. Calls the HW view of the selected NE. | |
Configuration | Calls the configuration tool (GUI) of the selected NE. For FOX61x NEs the user class needs to be selected in the sub-menu. |
Applicable to the NEs of the families FOX61x, FOX660, and FOX51x only. At regular intervals, FOXMAN‑UN checks if the NE configurations have been modified. Up to 5 (configurable) modified configurations can be recorded per NE. Any of these configurations can be restored via the “Restore Configuration” dialog. | |
Calls the alarm list filtered for the selected NE. | |
Synchronise ► Alarm | Updates the alarms in the FOXMAN‑UN database to reflect the current situation in the managed network for the selected NE. |
Synchronise ► Time | Updates the time (clock) in the NE with the system time. Only available for FOX51x NEs. |
Synchronise ► Inventory | Updates the inventory information in the FOXMAN‑UN database to reflect the current situation in the NE. |
Synchronise ► Service | Updates the service information in the FOXMAN‑UN database to reflect the current situation in the NE. Not available for FOX51x NEs. |
Force Polling | Requests an immediate poll of the NE. This will read the complete NE configuration, inventory, and alarm status information from the selected NE(s). |
Cancel Force Polling | Cancels a force polling while being executed. |
Stop Supervision | New alarms of the NE are not reported any more. The menu point changes to “Start Supervision” for that NE. |
Allows changing certain NE parameters or adding an operator message. | |
Allows moving one or several configured NEs to a different agent. | |
Delete NE | Removes the NE from the FOXMAN‑UN database. Note: The removed NE is automatically deleted from the Domain(s). |
1 Windows is a trademark of the Microsoft group of companies
NE of type “FO” (Foreign Object)
Note that some of the commands may not be available (shown disabled).
Remote Commands | Calls the Create Remote Command dialog. Lets you execute one of the predefined remote commands (see Create Remote Command). |
Activate <application_name> | If configured in the “NE of type FO” properties - Setup - Configuration - “Third Party EM”, this calls the third party element manager application. |
Calls the alarm list filtered for the selected FO. | |
Force Polling | Requests an immediate poll of the NE. |
Cancel Force Polling | Cancels a force polling while being executed. |
Stop Supervision | New alarms of the NE are not reported any more. The menu point changes to “Start Supervision”. |
Allows modifying the parameters of an existing NE of type “FO”. | |
Allows moving one or several configured NEs to a different agent. Only possible are agents supporting the type of NE, i.e., agents of type “FO” in this case. | |
Delete NE | Removes the selected item(s) from the FOXMAN‑UN database. |
Context menu in tree panel and commands for tab “Role Based Access Control”
The following describes the menu items available after placing the cursor over an item in the tree and clicking the right mouse button, and commands available in the details dialog for a selected item in the tree.
Domains
See above under “Context menu in tree panel for tab “NE Browser””.
Note that the domain “NMS-All” contains all objects (such as agents, domains, NEs, security profiles, services, SNMP security objects, symbols, users, etc.). This domain is used when you assign a role to a user. It grants access to some functionality defined by the user’s role on objects of that domain.
Users
Item “Users” in the tree selected:
+ Add | From the “+ Add” command on the right hand side of the “All Users” list in the details panel, allows adding a role-based user, selecting a system role or, if defined, a user defined role. The user must exist as a Linux user to be selectable from the drop-down list labeled “User Name”. |
– Remove | This command button on the right hand side of the “All Users” list in the details panel, allows the removal of an existing user from the defined RBAC users list. If the user was an OS user before, the selected user is deleted as a FOXMAN‑UN user, but still exists as an OS user. |
Any existing user in the tree selected:
Details panel | Shows the role(s) assigned to the user with the permissions for each of the function areas as defined while adding the user. |
[... Edit | Edit the user’s roles, i.e., - add new roles (“+ Add” button), - remove currently assigned roles (select role first; then press “– Remove” button), - define restrictions (press “Restrictions...” button) |
+ Add | In the edit mode, add roles to the user. Confirm with “Apply” or discard with “Cancel”. |
– Remove | In the edit mode, remove the selected role for the current user. Confirm with “Apply” or discard with “Cancel”. |
Restrictions… | While adding or editing a user, restrictions to the selected profile(s) can be applied; as a default restriction, an expiry date can be added to domain access for any of the defined domains. For restrictions with several domains, use - the “+ Add” button to add existing domains with an expiry date and time, or - the “– Remove” button to remove previously assigned domains with defined expiry date and time. |
Cancel | Close the edit mode without applying changes. |
Apply | Apply changes and close the edit mode. |
Roles
• When “System Roles” is selected: Expand or Collapse.
System roles are predefined by the system and cannot be added or removed.
• When any existing system role is selected in the tree, no specific commands available; system roles are predefined and fixed.
• When “User Defined Roles” is selected: Expand or Collapse.
In the right-hand (details) part of the dialog window:
+ Add | Add a user-defined role to the list of user-defined roles. Confirm with “Apply” or discard with “Cancel”. |
– Remove | When an existing user-defined role is selected in the details part of the dialog window, you can remove the selected role from the list of user-defined roles. Confirm with “Apply” or discard with “Cancel”. If the role was assigned to a user, it is immediately removed from the user’s roles. |
• When any user-defined role is selected in the tree:
Edit | From the “Edit” command on the right hand side of the user’s permissions details, switch to the edit mode to modify the access permissions for the selected user. Once done, you can either cancel or apply the changes. |
Cancel | Close the edit mode without applying changes. |
Apply | Apply changes and close the edit mode. |