
Link
Purpose
Displays all MPLS-TP or ENP links. These links can be equivalent to sections, created via the Section Management dialog, or they are links created via the Create Link dialog, whose endpoints are MPLS-TP interfaces, including VLAN sub-interfaces with usage set to MPLS-TP.
An ENP link has a bandwidth attribute (Available BW) used for the LSP path computation. The default link bandwidth is computed from the physical port characteristic of the end points. The user can overwrite this default bandwidth for the LSP path computation by modifying the “Link BW” value.
A link based on a VLAN sub-interface has a bandwidth attribute specified during creation of the VLAN sub-interface.
Allows you to modify the following Link parameters via the Link Details (dialog window) dialog:
− Name,
− Link Bandwidth (Total BW),
− Use for Routing,
− Cost.
The Link’s Name and Cost are taken from the section as default values upon link creation. Once created they are not related to the section anymore. The section and the link names and costs can be modified independent of each other.
A subset of the entries in the Link table is filtered with the Class Type Filter on the left hand side (see ENP Main Window).
Please note:
An ENP link is removed from ENP when:
• The user deletes the section.
• The user removes one of the ENP interface end points.
• The user removes one of the NE endpoints from the ENP domain.
• The user deletes one of the NE endpoints.
Dialog image
ENP – Link
Mandatory entries
Not applicable.
Optional entries
The following parameters can be modified:
− Name (there is only one name per link, independent of the Class Type),
− Total Bandwidth (BW) of the link (requires Traffic Engineering user privileges); can be modified individually per CT link,
− Use for Routing; can be modified individually per CT link,
− Cost; can be modified individually per CT link.
Informational content
Name | The specified link Name as configured via section management or via link creation. Note: There is only one name per link, independent of the Class Type. An existing section name is only taken as the default name upon link creation. |
A End NE | The A End NE. |
A End TP | The A End Termination Point Label or unit/slot#/MPLS-TP port#. If this is a VLAN sub-interface, the VLAN is also shown. |
Z End NE | The Z End NE. |
Z End TP | The Z End Termination Point Label or unit/slot#/MPLS-TP port#. If this is a VLAN sub-interface, the VLAN is also shown. |
Status | The link status. A link with a status other than “Valid” usually requires operator intervention. More information on possible reasons for a non-valid link can be found in “Link Details…”. Possible actions are “Synchronize Link” or “Reset Bandwidth”. The link status can be - Missing Section: No physical section exists for the link. Use the context menu option “Create Section”. - Missing Interface: An interface (mplsif) of the link is missing. - Missing Section and Interface: Both section and interface(s) are missing and need to be created for the link getting valid. |
BW Enforcement | Indicates whether bandwidth enforcement is applied or not. BW enforcement is possible when a HQoS profile has been applied to the link and/or the NEs terminating the link. The following options are possible: - Enabled: all “BW Enforcement” options are enabled on the link; - Disabled: None of the “BW Enforcement” options are enabled on the link; - Partial Enabled: Some of the “BW Enforcement” options are enabled on the link, some aren’t; - Unsupported: HQoS (egress shapers) not supported on the link; - Unknown: Default status (as long as ENP is not synchronized with the NE). |
Supervision | Service Supervision status, - Running: this link is supervised. Supervision can be paused or disabled via the “Supervision ► Pause” or “Supervision ► Disable…” commands in the context menu or the “Edit” menu. - Paused: service supervision is paused on this link. It can be resumed via the “Supervision ► Resume” command in the context menu or the “Edit” menu. - Disabled: service supervision is disabled on this link. It can be enabled via the “Supervision ► Enable…” command in the context menu or the “Edit” menu. |
Superv. Oper State | Shows the operational state (up, down) of the service supervision on this link. This field is empty when service supervision is disabled. |
Fault State | Shows the highest active fault state of the link. |
Oversubscription [kbit/s] | Shows the amount of over-subscription in kbit/s of the link bandwidth if any over-subscription is present. The column is only visible if over-subscription occurs on at least one link. |
Encryptable | Indicates the capability of the link to encrypt tunnels / tunnel segments. Options are: - None: tunnel cannot be encrypted. - A End: tunnel can be encrypted only on A End. - Z End: tunnel can be encrypted only on Z End. - A/Z End: tunnel can be encrypted on both ends. |
RDM BW Used / Total [kbit/s] | Link bandwidth for RDM model-based services. The used bandwidth vs. total bandwidth are shown as numeric values and as a graphical bar. |
MAM BW Used / Total [kbit/s] | Link bandwidth for MAM model-based services. The used bandwidth vs. total bandwidth are shown as numeric values and as a graphical bar. |
Reserved BW [kbit/s] | Total reserved bandwidth of all configured (saved in the database or deployed) Tunnels using this link. Note: When a link carries Tunnels with BFD (Bidirectional Forwarding Detection) Sessions, a bandwidth of 10 kbit/s per tunnel with active BFD is added to the Reserved BW of the link. |
Distinct | Indicates whether the link is a distinct link or not. If distinct, the link is used as physically separate link for working and protected LSPs. |
Controls (buttons, menu items, etc.)
Edit
Create Link | Calls the Create Link dialog. | |
Link Details… | Calls the Link Details (dialog window) dialog. In this dialog you can edit / modify some of the link parameters for a selected Class Type. | |
Open A End NE <user class>… | Open the NE configuration of the A End NE of the link. You need to select the user class in the sub menu. The FOXCST GUI will open in a new window. | |
Open Z End NE <user class>… | Open the NE configuration of the Z End NE of the link. You need to select the user class in the sub menu. The FOXCST GUI will open in a new window. | |
Split Link… | This command is only available when Expert Mode is enabled (see Options - Expert Mode). Opens the “Split Link” dialog. In this dialog you can split an existing link to insert a new NE. | |
Create Section | For a link without section, a section can be created. For links with an underlying section this command is not available. | |
Manage Tunnel… | This command is only available when Expert Mode is enabled (see Options - Expert Mode). Opens a dialog to manage all tunnels on the selected link. Any selected tunnel(s) can be: - edited (also see Modify Tunnel…), - automatically re-routed if required, - saved, - deployed, - reset, as far as their current configuration status is appropriate for any of these actions. E.g. a deployed, non-modified tunnel cannot be saved or deployed. Note: When you edit a tunnel, its Status can become “Deployed Invalid” because it has been “Deployed” but some parameters have been modified. In order to get back to a valid state you should Deploy the changes by selecting the tunnel and choose “Deploy Tunnel”. | |
Synchronize Link |  | Synchronize the settings for the selected link as they are present to the database. |
Reset Bandwidth | You can reset the Link Bandwidth to the originally configured value If you have modified the bandwidth of the link. | |
Switch BW Enforcement | Opens a sub menu to select bandwidth (BW) enforcement. On Link level only Class Type Shapers of the interface are changed. The following options are available: - On (BW enforcement may be partial); - Off (BW enforcement may be partially allowed). | |
Delete Link… | Delete the selected link. This will cause all tunnels over this link to get invalid and will delete the underlying section. You need to confirm this action. | |
Create a new dashboard in the metrics database application for the selected link. This will execute a script on the server to create a performance monitor. The dashboard with the given “Link_name” will appear in the Metrics Database in the tab “Boards”. Start and end of the execution will be logged in the event list. | ||
Supervision ► Enable… | Enable supervision of all services on this link. To do that, the service information attributes Customer, Service Level Agreement, and Network need to be selected. | |
Supervision ► Disable… | Enable supervision of all services on this link. Must be confirmed by the user. If any service supervision cannot be disabled, an error message is shown with the respective reason(s). | |
Supervision ► Resume |  | Resume service supervision that has been paused before. |
Supervision ► Pause |  | Pause service supervision. |
Supervision ► Reload Configuration | Reloads the configuration from the NEs to make sure it is up to date in case of recent changes to the link. | |
Supervision ► Show Details… | Show service supervision details for this link. Opens the services in a view-only window of the Service Editor. The windows also provides an alarm tab showing active alarms of the link. | |
Supervision ► Show in Service Supervision… | Opens the service supervision dialog with a filtered view for the service(s) running via this link. | |
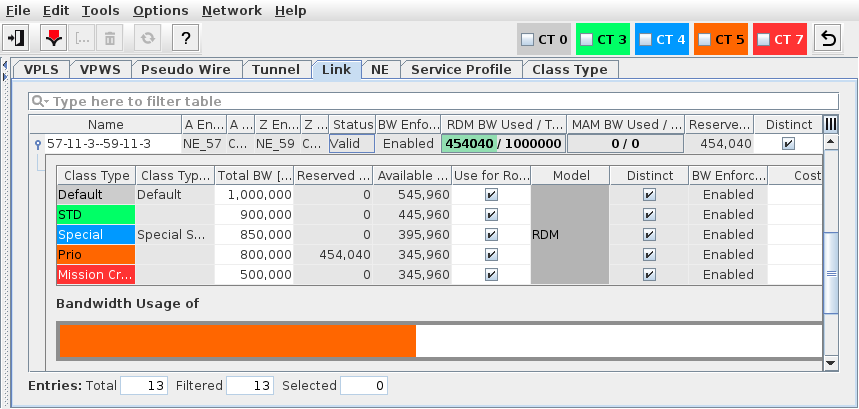
Link Details (expanded Link entry)
The expanded Link entry includes a graphical diagram of the bandwidth usage per Class Type of the selected link.
The Class Type Filter criteria (see ENP Main Window) apply to this diagram.
Class Type | Class Type as defined via the Class Type (HQoS Class Type Definition) dialog. |
Class Type Description | Class Type Description as defined via the Class Type (HQoS Class Type Definition) dialog. |
Total BW [kbit/s] | Total bandwidth assigned per Link and Class Type. This parameter can be edited in-line. Note: You require Traffic Engineering privileges in order to edit this parameter. With Class Type “None” selected, the Physical Bandwidth is shown. |
Reserved BW [kbit/s] | Reserved bandwidth per Link and Class Type, including the bandwidth reserved for BFD (Bidirectional Forwarding Detection) sessions, if applicable. |
Used / Total BW [kbit/s] | Shows the used vs. total bandwidth, and a colored graphical bar as background. |
Available BW [kbit/s] | Available bandwidth per Link and Class Type. |
Use for Routing | Indicates if the link is used by Manual or Auto Routing engine for path calculation. The mark in the checkbox can be set or removed in-line individually for each CT link / Class Type. |
Model | Indicates the model |
Distinct | Indicates whether the link is distinct or not. |
BW Enforcement | Indicates whether bandwidth enforcement is enabled or disabled, or unsupported. |
Cost | The configured link cost. This parameter can be edited in-line individually for each CT link. Note: Recommended values for each link speed are as follows: 10 Gbit/s: 2 1 Gbit/s: 4 100 Mbit/s: 19 10 Mbit/s: 100 |
Dialog image
Link Details (dialog window)
The dialog is opened in a separate window, called from the “Link” tab of the ENP main dialog window.
Link [Name]
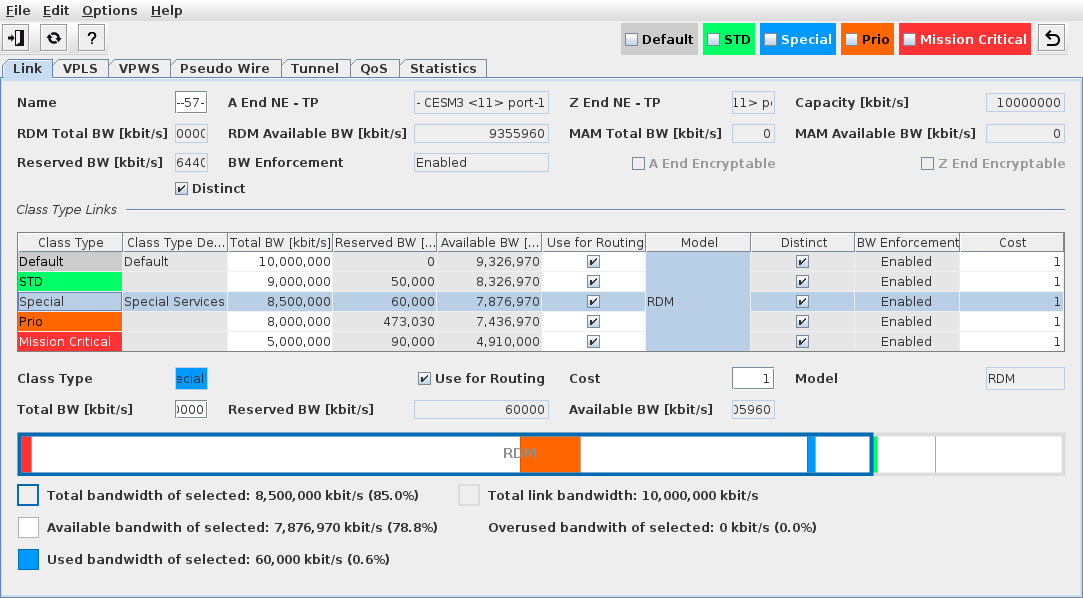
Shows details on bandwidths for all Class Types if no specific Class Type is selected.
Allows the following information to be displayed per Class Type; if required the Class Type Filter is chosen in the icon bar of the dialog window:
− Link details,
− VPLS details,
− VPWS details,
− PW details,
− Tunnel details,
− QoS details,
− Statistics.
Link
In the Link tab, when a specific Class Type is selected in the table of Class Type Links, the following Link parameters can be modified:
− Name (only one name per link, independent of the Class Type),
− Use for Routing,
− Cost,
− Total BW [kbit/s] (requires Traffic Engineering user privileges),
− Distinct.
The following further tabs are available in the Link Details dialog:
VPLS
Lists all the VPLS in which the selected link is used. For a selected VPLS you can open the details view and other options via the context menu.
For more details, please refer to VPLS.
VPWS
Lists all the VPWS in which the selected link is used. For a selected VPWS you can open the details view and other options via the context menu.
For more details, please refer to VPWS.
Pseudo Wire
Lists all the Pseudo Wires for which the selected link is used. For a selected PW you can open the details view and other options via the context menu.
For more details, please refer to Pseudo Wire.
Tunnels
Lists all the Tunnels in which the selected link is used. For a selected tunnel you can open the details view and other options via the context menu.
For more details, please refer to Tunnel.
QoS
Controls (buttons, menu items, etc.)
Edit Shaper settings | Changes to edit mode. Only available when in view mode. While in Edit mode, specific parameters can be modified, and changed shaper and/or drop profile settings can be deployed. | |
Deploy Shaper settings | Modified shaper and/or drop profile settings are deployed to the link, and to the involved NE(s), respectively. Only available while in edit mode. | |
Cancel |  | Cancel any modifications made to the shaper and/or drop profile settings. Only available while in edit mode. |
Align Both Sides - [HQoS Profile] | Align both ends of the link with the (modified) settings of the specific HQoS profile. The HQoS profiles are only aligned on both ends if any HQoS profiles are defined (see HQoS Profile (Definition)) and if both ends of the link support BW enforcement. Only available while in edit mode. | |
Align A End - [HQoS Profile] | Align the A End of the link with the (modified) settings of the specific HQoS profile. To align, the A End must support BW enforcement. Only available while in edit mode. | |
Align Z End - [HQoS Profile] | Align the Z End of the link with the (modified) settings of the specific HQoS profile. To align, the Z End must support BW enforcement. Only available while in edit mode. | |
Re-Align - [HQoS Profile] | Re-align both ends of the link with the (modified) settings of the specific HQoS profile. Only available while in edit mode. | |
Clear | Deletes all Shaper settings for the current link. This can be applied via “Deploy Shaper settings” or canceled via “Cancel”. Only available while in edit mode. | |
Switch BW Enforcement | On Link level only Class Type Shapers of the interface are changed. The following options are available: - On (BW enforcement may be partial); - Off (BW enforcement may be partially allowed). |
Shows details on QoS settings for the link. The details are sub-divided into two tabs, “Shaper” and “Drop Profile”.
If a port (or its NE) is not supporting BW enforcement, a corresponding information is shown instead.
QoS - Shaper
In the “Shaper” tab, all used Class Type Shapers are shown with their Class Type, Model, and further QoS settings on both the Initiator and Terminator ports, such as (table 1):
• HQoS Profile,
• Status,
• BW Enforcement,
• CIR,
• CBS,
• EIR,
• EBS,
• Priority,
• Scheduling Profile,
and (table 2):
• DP TC0 … DP TC7.
QoS - Drop Profile
In the “Drop Profile” tab, provided the related NE supports egress shaping, NE related information on drop profiles is shown, such as:
• Initiator NE Drop Profiles with
− Index,
− Threshold,
− Status.
• Terminator NE Drop Profiles with
− Index,
− Threshold,
− Status.
With the “Edit” icon Drop Profiles can be added (as long as the maximum is not reached) and/or deleted. When adding a Drop Profile the Threshold for the new profile is requested.
While in Edit mode, the “Set Change on Both Side” option defines how the changes are applied, either to one end of the link only, or to both ends.
Statistics
Shows statistics for the link. The availability of statistics presumes the setup of a PM data collection job (see Create PM Collection Job). The following options are available:
Time Range | Select from the following time ranges: - Day, - Week, - Month, - Year, - Custom. |
Granularity | Select the required granularity (measurement interval): - 24h, - 15min. |
From | When a custom time range is required, enter the start date and time for the required interval. |
To | When a custom time range is required, enter the end date and time for the required interval. |
Ethernet | Shows graphical diagram of the collected Ethernet PM data for this link, provided an appropriate PM data collection job has been defined. |
TC Egress Queues | Shows traffic details on the link’s traffic class egress queues. This includes: - information on the A End and Z End NE, port, port layer rate, port utilization, traffic class usage, traffic class packet loss, and loss ratio (where applicable); - a selector for the Data options (Throughput, Volume), - a selector for the display type (Stacked, Line), - a selector for the display unit (kbps, Mbps, Gbps), - a summarized view with a time diagram of throughput and loss ratio, with a diagram of used and available bandwidth, and a table of throughput and loss ratio per TC. - a view for the A End port with a time diagram of throughput and loss ratio, with a diagram of used and available bandwidth, and a table of throughput and loss ratio per TC, - a view for the Z End port with a time diagram of throughput and loss ratio, with a diagram of used and available bandwidth, and a table of throughput and loss ratio per TC. |
Export | Allows you to set export or print options for the statistics data. The following options are available: - Data Source (Ethernet, Egress Queue), - Unit (Packets, Octets), - Output Port (A End, Z End), - Direction (Received, Transmitted), - Additional Info (Errors, Collisions/Overload). The following command buttons are available to export the data with the options selected: - Print, - Export. A table lists the records that are prepared for export, matching the selected options. |
Related dialogs / windows