
Create PM Collection Job
Purpose
The PM Collection Job Wizard allows the user to create new PM collection job and to modify or duplicate an existing PM collection job.
The wizard has two types of panels: Job Properties and Selection Panel.
The Job Properties panel allows the user to define the Job Name, Statistics, and to activate the Job.The Selection Panel allows the user to specify the PM data collection point(s), which depends on the selected NE and Unit. In general, for FOX61x NEs, the collection point can be on the level: NMS, Network Elements, Units or Ports.
Please note:
Only select NEs of the same product family when creating a PM collection job. Do not mix NE types like e.g. FOX61x and FOX51x in one job since such mixed jobs will not be saved and applied correctly.
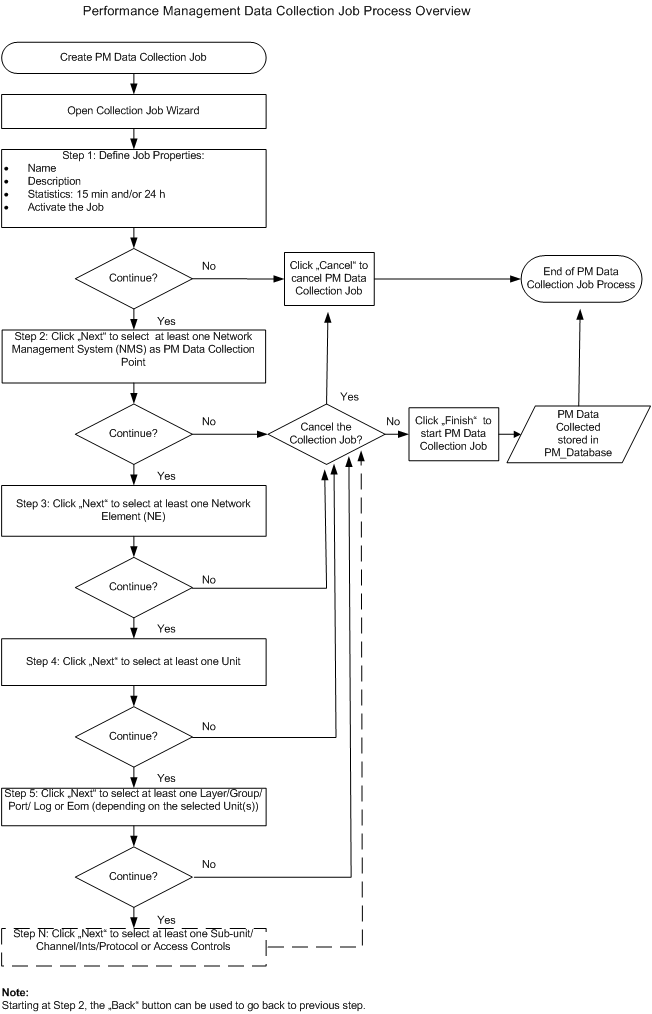
The PM collection process is shown in the diagram below.
Please note:
In the PM collection process diagram below, steps 5 and N are applicable only to NEs of type FOX51x. For NEs of type FOX61x, only steps 1 to 4 are available.
Dialog image
Job Properties

Mandatory entries
Name | The name will be used to identify the PM collection job on the list of created PM data collection schedules. |
Statistics | PM collection periodicity:15 min or 24 h. At least one of the two types must be selected to proceed to the “Next” step. |
Statistics - 15 min | When enabled, the job will collect PM data for 15 minutes PM intervals. |
Statistics - 24 h | When enabled, the job will collect PM data for 24 hours PM intervals. |
Optional entries
Description | Enter a job collection description that allows other users to understand the purpose of the job. |
Active | The box must be ticked for the PM collection job to run. If no PM data is required, the collection can be stopped without deleting the job by editing the job and removing the tick in the “Active” checkbox. |
Informational content
Steps | The highlighted step 1: Job Properties is the current step or the currently opened window. Step 2: Select NMSs is the next step or the next window to be opened. |
Controls (buttons, menu items, etc.)
? Help | Starts the FOXMAN‑UN help viewer and opens this page. |
< Back | Disabled for this dialog (see flow diagram above). |
Next > | Calls the next step dialog (see flow diagram above). |
Finish | Disabled for this dialog. |
Cancel | Closes the dialog without applying the modifications. |
Dialog image
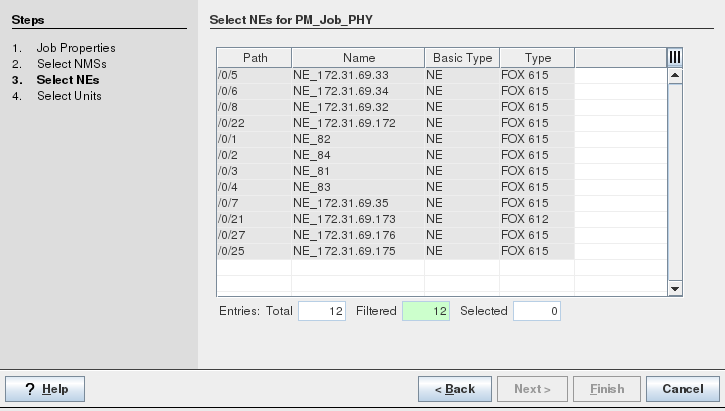
Selection Panel - NEs
Mandatory entries
Not applicable.
Optional entries
Not applicable.
Informational content
Steps | Shows the previous step(s) done, the current step (highlighted texts) and the next step. |
Table | List the available PM data collection points. |
Table - Path | Shows the path address as: / NMS_ID / NE_ID |
Table - Name | NE name as specified during NE creation. |
Table - Basic Type | Basic type, usually “NE”. |
Table - Type | NE type as specified during NE creation. |
Controls (table)
Table | Allows the user to select the PM data collection point(s). Ctrl+A: selects all the listed collection points. Ctrl+mouse selection: selects several collection points. |
Table Sorting and Filtering/Export and Printing
Please refer to Table Sorter section for details.
Controls (buttons, menu items, etc.)
? Help | Starts the FOXMAN‑UN help viewer and opens this page. |
< Back | Calls the previous step dialog (see flow diagram above). |
Next > | Calls the next step dialog (see flow diagram above). |
Finish | Starts the PM data collection. |
Cancel | Closes the dialog without applying the modifications. |
Dialog image
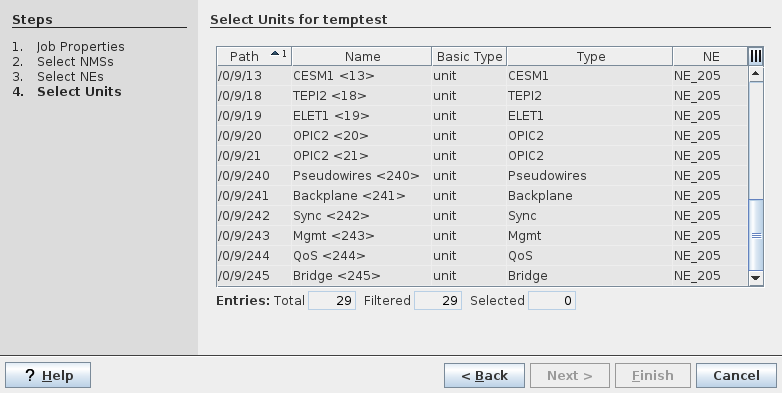
Selection Panel - Units
Mandatory entries
Not applicable.
Optional entries
Not applicable.
Informational content
Steps | Shows the previous step(s) done, the current step (highlighted texts) and the next step. |
Table | List the available PM data collection points. |
Table - Path | Shows the path address as: / NMS_ID / NE_ID / Unit_ID. |
Table - Name | Unit type followed by <physical or logical slot ID>. |
Table - Basic Type | Basic type, usually “unit”. |
Table - Type | Unit type, either - the type (name) of physical (pluggable) unit as configured during NE setup or inherent to the NE, or - the type of a logical unit that is part of the NE. |
Table - NE | NE type as specified during NE creation. |
Controls (table)
Table | Allows the user to select the PM data collection point(s). Ctrl+A: selects all the listed collection points. Ctrl+mouse selection: selects several collection points. Single mouse click; selects a collection point. |
Table Sorting and Filtering/Export and Printing
Please refer to Table Sorter section for details.
Controls (buttons, menu items, etc.)
? Help | Starts the FOXMAN‑UN help viewer and opens this page. |
< Back | Calls the previous step dialog (see flow diagram above). |
Next > | Calls the next step dialog (see flow diagram above). |
Finish | Starts the PM data collection. |
Cancel | Closes the dialog without applying the modifications. |