
ENP Main Window
Purpose
The main window displays the list of all existing VPWS and VPLS services, Pseudo Wires, Tunnels, Links, NEs, and Service Profiles. It likewise allows you to:
• Set and clear filters such as:
− Class Type filter; this filter hides / shows entries that match the Class Type filtering criteria. Undefined Class Types are marked in red.
− Tunnel filter;
− Link filter;
− NE filter;
• Create/Edit/Add/Delete:
− Services (VPLS, VPWS),
− Tunnels,
− Links (Sections),
− NEs,
− Service Profiles.
• Deploy:
− Services (VPLS, VPWS),
• Align:
− Services (VPLS, VPWS),
• View Details of:
− Services (VPLS, VPWS),
− Pseudo Wires,
− Tunnels,
− Links,
− NEs,
− Service Profiles.
Please note:
The left-hand side “Filter” section of the dialog window can be expanded or collapsed by clicking on the window section border left or right arrows.
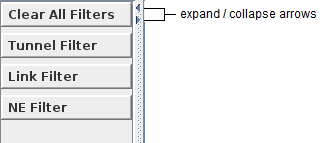
A click on one of the filter buttons expands or collapses the related filter options. To select a filter option, click on the filter type and set a mark in the respective checkbox.
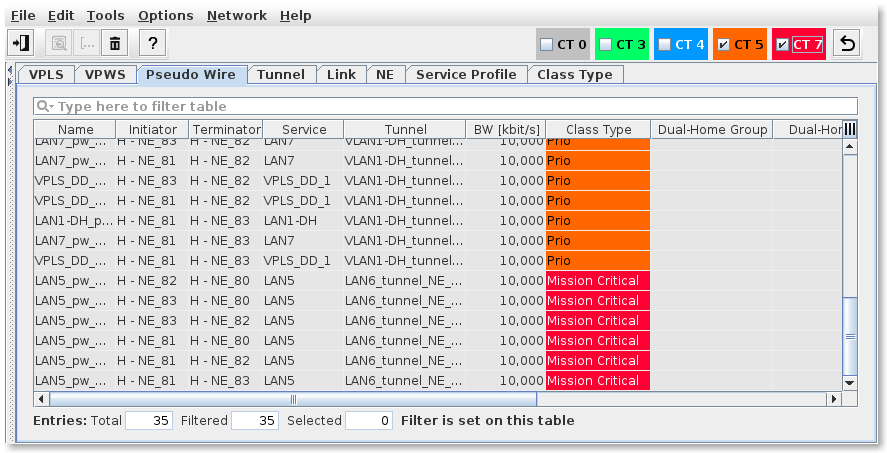
In addition to the above filters, Class Type filters are available in the icon bar of the ENP main window. For Class Type filters only the Class Type named “Default” is available per default, unless further Class Types are created. Refer to “Class Type (HQoS Class Type Definition)” for more details. When a Class Type is marked only the items using the selected Class Type are shown as illustrated in the following example showing filtered Pseudo Wires:
Ethernet Networking Package
The menu of the ENP main window is context sensitive, i.e. the available menu selections are adopted to the selected tab. Also the NEM Help is context sensitive.
A Class Type that is used in a service configuration but not available in the list of Class Types is marked with a red background and named “UNDEFINED (n)”. Also all related services, Pseudo Wires, tunnels, links, and service profiles that use such a Class Type are marked in red.
Undefined Class Types may possibly have a severe impact on the traffic engineering related behavior of your network. You should therefore make sure that all required QoS settings are stored and provided in well defined Class Types.
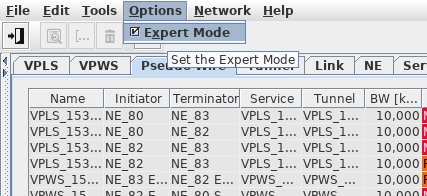
Options - Expert Mode
The Expert Mode is activated from the ENP main menu under “Options”.
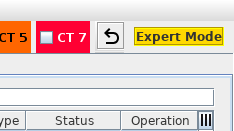
While the Expert Mode is active a highlighted “Expert Mode” note is displayed in the upper right corner of the ENP window.
Network - Synchronize
Used to synchronize ENP with the network. See Synchronize.
Network - Clear and Synchronize
Only available in Expert Mode. See Clear and Synchronize.
Please note:
For background information on ENP and sample network provisioning configuration, please refer to sections:
Network - Session Manager…
Lists all currently open “Create” and “Edit” sessions in ENP. See Session Manager….
Controls (buttons, menu items, etc.)
Clear All Filters
Clear All Filters | Clears all filters. The result of this action is that all contents are shown in the individual tables. |
Tunnel Filter
Tunnel |   | Marking the respective tunnel’s checkbox sets a filter for that tunnel. Applies to the lists of VPLS, VPWS, and Pseudo Wires. |
Link Filter
Link | | Marking the respective link’s checkbox sets a filter for that link. Applies to the lists of VPLS, VPWS, Pseudo Wires, and Tunnels. Note: The filtering is applied so that e.g. tunnels are filtered (visible) for which the selected link(s) are carrying either the working or the protecting LSP. |
NE Filter
NE | | Marking the respective NE’s checkbox sets a filter for that NE. Applies to the lists of VPLS, VPWS, Pseudo Wires, and Tunnels. Note: The filtering is applied so that e.g. tunnels are filtered (visible) for which the selected NE(s) are either Initiator, Terminator, or Transit node of at least a Pseudo Wire. VPLS that are only involving one NE (i.e. local VPLS limited to a single NE) are only displayed when no NE is selected in the NE Filter. |
File
Exit | Quit Ethernet Networking Package. |
Edit
The menu options available under the “Edit” menu depend on the currently selected tab in the ENP main window. For more details see the links under “Related dialogs / windows” at the end of this chapter.
Tools
The “Tools” menu provides the dialogs for some of the basic settings for ENP networks used for definition of Class Types and QoS control.
Edit Class Types | Calls the Class Type (HQoS Class Type Definition) dialog. |
HQoS Configuration Manager… | Calls the HQoS Configuration Manager dialog. |
Basic TE Configuration | Expands to the following menu options: |
Show Network Audit Result… | Calls the Network Audit Result dialog. |
Schedule Network Alignment… | Calls the Schedule Network Alignment dialog. |
Schedule Network Audit… | Calls the Schedule Network Audit dialog. |
Manage Reference Data… | Calls the Manage QoS Reference Tables dialog. |
Backplane Audit | Expands to the following menu options: |
Show Backplane Audit Result… | Calls the Backplane Audit Result dialog. |
Schedule Backplane Audit… | Calls the Schedule Backplane Audit dialog. |
Options
Expert Mode | | When the checkbox is marked, the expert mode is enabled and an indication is activated in the upper right corner of the ENP main window:  The expert mode allows you to - Modify the binding of the Pseudo Wires. The default binding setting gives you an H-VPLS. All nodes, ports are connected to each other and can send packets to each other. With modifying the binding it is possible to create an E-Tree. However, the correctness of the service is not checked in this mode. - Clear and Synchronize ENP with node configurations. - Modify HQoS Constants. |
Caution! This advanced GUI mode does not do additional checks (like e.g.: only one VPLS node is allowed). Only recommended if you are a highly experienced user since you run the risk of corrupted configurations if you make any inconsistent changes. | ||
Class Type Filter | | Select one of the two Class Type filter identifications: - Long: The Class Type Name is shown as Class Type identification in the icon bar filter, e.g. “Default”. - Short: The abbreviation “CT” and the Class Type [0…7] are used as Class Type identification in the icon bar filter, e.g. “CT 0”. |
Network
Synchronize |  | The command “Network - Synchronize” forces a synchronization of the node configurations with the ENP database. This may be required when node configurations have been modified e.g. using the local craft terminal FOXCST. Synchronization duration depends on the network size; a synchronization may take several minutes to complete. |
Caution! When you confirm and execute a synchronization, all open sessions for modifying ENP related objects will be closed. Any user that was using the sessions will encounter non-expected behavior. Such behavior can e.g. cause the user not to be able to save changes made to ENP objects, or not to conclude an ENP object creation process. The sessions will not be re-opened after the synchronization has been terminated. They will have to be restarted by the user. | ||
Clear and Synchronize | The “Clear and Synchronize” command is only active when the Expert Mode is enabled. This command forces the removal of all saved but not deployed ENP objects and a synchronization of the node configurations with the ENP database. It also removes all ENP objects (such as services, PWs, tunnels) from the database and reloads them from the network. | |
Caution! When you confirm and execute the “Clear and Synchronize” command, all ENP objects that are saved but not deployed will be deleted, and all open sessions for modifying ENP related objects will be closed. Any user that was using the sessions will encounter non-expected behavior. Such behavior can e.g. cause the user not to be able to save changes made to ENP objects, not to deploy a created service, or not to conclude an ENP object creation process. The sessions will not be re-opened after the synchronization has been terminated. They will have to be restarted by the user. | ||
Session Manager… | Lists all currently open “Create” and “Edit” sessions in ENP with Name (tunnel or service name), Type, Location, Owner, Host Name, and Parent ID. The list can be updated with the “Refresh” button. When you create or modify a tunnel or service in ENP, that session can be revoked by an administrator if required via the button “Shut down Session…” if Expert Mode is enabled. This may be required if, for whatever reason, there is an issue with the current session. You need to confirm the shutdown of the session(s). |
Help
? Help | Calls the help viewer of the currently active Tab. |
Class Type Filter (in icon bar)
Default, (specified Class Types) | | Enable (show) or disable (hide) table entries in the Main Window’s tables per Class Type. For each Class Type that has been defined (see Class Type (HQoS Class Type Definition)) entries that depend on that specific Class Type can be shown or hidden in the tables. Applies to the lists of VPWS, Pseudo Wires, Tunnels, and Service Profiles. The Class Type Filter switches are listed with colored background in the icon bar of the ENP main window. The Class Type filter IDs can be toggled between short or long IDs using the menu selection “Options - Class Type Filter - Short” or “Options - Class Type Filter - Long”. Note: With no Class Types selected all table contents are displayed (equal to all Class Types selected). |
Clear Class Type Filter | Clears the settings made to the Class Type filter so that no filtering is applied anymore. |
Table Sorting and Filtering/Export and Printing
Please refer to Table Sorter section for details.
Related dialogs / windows
VPLS tab,
VPWS tab,
Pseudo Wire tab,
Tunnel tab,
Link tab,
NE tab,
Service Profile tab, Service Profile Details (depend on license option),
Tools: Schedule Network Audit,
Tools: Schedule Network Alignment,
Tools: Network Audit Result,
Tools: Manage QoS Reference Tables,
Tools: Backplane Audit Result,
Tools: Schedule Backplane Audit,