
Class Type (HQoS Class Type Definition)
The “Class Type” dialog is called from the ENP menu “Tools – HQoS Configuration Manager” by opening the “Class Type” tab.
Purpose
Displays existing (active) Class Types.
Allows you to define and modify Class Types while in edit mode.
Allows you to import and export Class Types while in edit mode.
The dialog window includes some dependencies between Class Types, Class Type Links, and Bandwidths per Class Type. For a smooth configuration please consider the following rules:
• To edit Class Types click on the “Edit” icon.
• Only configure Class Types that will be used, i.e. set a mark in the “Used” column only for Class Types that are used now or in future in your MPLS-TP network. For an example refer to Sample Class Type Concept and Sample Use of Class Types and QoS Scheduling.
• Select one of the Class Types at a time in the Class Types table, enter a Name and a Description, select the Scheduling, define the Traffic Class(es) and Network Control(s), select the Model (RDM or MAM), and pick a color. Click the “Select Service Categories” icon to choose one or several service categories.
Note:
The model (RDM or MAM) may be predetermined already and depend on the model chosen for the highest Class Type 7 (when RDM was already set) or the lowest Class Type 0 (when MAM was already set).
Note:
The model (RDM or MAM) may be predetermined already and depend on the model chosen for the highest Class Type 7 (when RDM was already set) or the lowest Class Type 0 (when MAM was already set).
• Once a Class Type is activated (set to “used”), enter the required bandwidths in the “Total Bandwidths per Class Type [kbit/s]” column of the Class Type Links table. The bandwidths need to be entered before applying any new defined Class Type.
Please note:
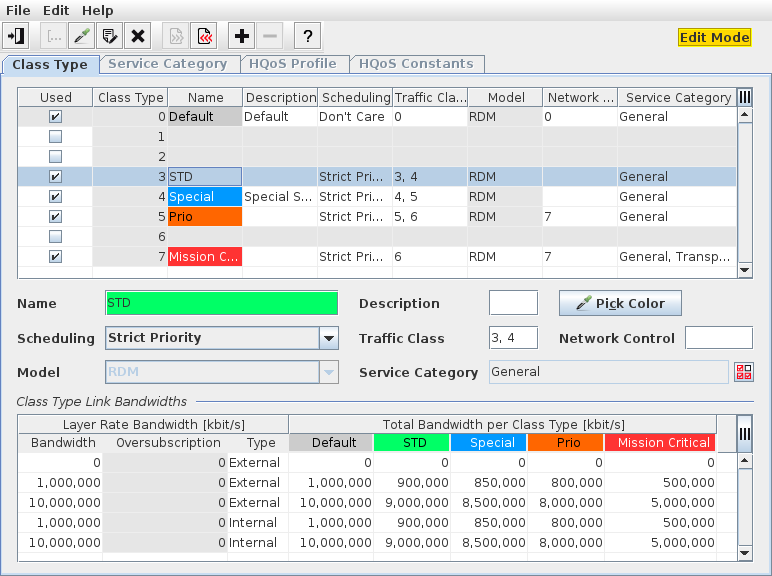
Make sure that the bandwidth of a specific Class Type Link / Class Type combination is equal or smaller than the bandwidth of its left-hand side column entry. As an example:
Layer Rate Bandwidth | Total Bandwidth per Class Type [kbit/s] | ||||||
|---|---|---|---|---|---|---|---|
Bandwidth | Oversubscription | Type | Default (CT0) | CT3 | CT4 | CT5 | CT7 |
1,000,000 | 0 | External | 1,000,000 | 900,000 | 850,000 | 800,000 | 500,000 |
10,000,000 | 0 | External | 10,000,000 | 9,000,000 | 8,500,000 | 8,000,000 | 5,000,000 |
1,000,000 | 0 | Internal | 1,000,000 | 900,000 | 850,000 | 800,000 | 500,000 |
10,000,000 | 0 | Internal | 10,000,000 | 9,000,000 | 8,500,000 | 8,000,000 | 5,000,000 |
Please note:
As a default the Class Type 0 (CT0) bandwidth corresponds to the bandwidth of the physical link. The user can however modify the CT0 bandwidth if over-subscription or under-subscription of the link is required. The CT0 cannot be removed by the user.
Over-subscription depends on the Class Type Model used. Special attention to over-subscription has to be taken with the use of the MAM (Maximum Allocation Model).
Over-subscription depends on the Class Type Model used. Special attention to over-subscription has to be taken with the use of the MAM (Maximum Allocation Model).
Please note:
A Class Type that is used in a service configuration but not available in the list of Class Types is marked with a red background and named “UNDEFINED (n)”. Also all related services, Pseudo Wires, tunnels, links, and service profiles that use such a Class Type are marked in red. This happens if you deactivate (remove the mark in the “Used” checkbox) a Class Type that is being used in service profiles and services or import Class Type definitions that do not match the Class Types used.
Dialog image
Class Type (Edit mode)
Mandatory entries
Not applicable.
Optional entries
Please note:
The creation of Class Types is optional. However for appropriate Quality of Service settings the management of Class Types is a basic prerequisite and therefore strongly recommended.
Informational content, Class Types
Used | Indicates whether the Class Type is available and can be used in a service profile. Used = true: Class Type is available. Used = false: Class Type is not available / is undefined. Note: If you deactivate any of the Class Types, tunnels that are currently using that Class Type will continue to use it. The Class Type entry will however be marked with red color and named “UNDEFINED”. |
Class Type | The scheduling Class Type in the range 0…7. |
Name | The specified Name for the Class Type. |
Description | The configured description of the Class Type. |
Scheduling | The scheduling type. |
Traffic Class | Comma separated list of traffic classes from 0 to 7. Note: It is strongly recommended not to use class 7 as traffic class. |
Model | Defines the Class Type model. As a default, all Class Types are set to RDM. The model can be set to MAM for the highest Class Type only. Once set, it can also be modified to MAM for the next lower Class Type. If all Class Types are set to MAM, changing back to RDM can only be started with the lowest Class Type (0). Select either of the following two options: - RDM (Russian Doll Model), - MAM (Maximum Allocation Model). |
Network Control | Comma separated list of traffic classes from 0 to 7. Note: It is recommended to use class 7 for network control. |
Service Category | Select one of the service categories defined under the “Service Category” tab. |
Informational content, Class Type Links
Layer Rate Bandwidth [kbit/s] | Indicates the bandwidth of existing Class Type links and an over-subscription if applicable. The “Type” indicates whether the interface is an external interface (front ports of a unit) or an internal interface (backplane ports of a unit). Note: The pair of Bandwidth & Type is used as identifier for a physical link, i.e. a 10 Gigabit per second Ethernet link would show as “10’000’000 External”. VLAN sub-interfaces are also listed in this table with their assigned bandwidth if they differ from the physical link bandwidth. When in the “Edit” mode, the user can edit the Layer Rate Bandwidth(s) for each Class Type Link, which may result in over- or under-subscription. |
Total Bandwidth per Class Type [kbit/s] | Indicates the bandwidth per Class Type of existing links. Note: When in the “Edit” mode, the user can edit the Total Bandwidth per Class Type for each Class Type. The bandwidths entered here are used as the default bandwidths for all new links. Editing the “Default” Class Type bandwidth to a value above the physical link bandwidth results in an over-subscription of the link. |
Controls (buttons, menu items, etc.), Class Types
Edit Class Type Definition |  | Switch to edit mode to modify Class Type definitions. Important Note: In order to apply modifications to the Class Type definition made in the edit mode, the modification need to be saved and the ENP core needs to be restarted. The changes are only effective after an ENP core stop / ENP core start sequence. As an administrator execute the commands: /opt/nem/bin/private/enpcorestop /opt/nem/bin/private/enpcorestart This action will close the HQoS Configuration Manager dialog window. |
Save |  | Save the modifications made to Class Types. Only available in edit mode. |
Cancel |  | Exit edit mode without saving Class Type modifications. Only available in edit mode. |
Export |  | Opens a dialog to select a Class Type file for export of stored Class Types. Exports the “Planned” Class Type definition to a file which is XML-formatted and will be signed. Currently the “Active” Class Type definition cannot be exported. Only available in edit mode. |
Import |  | Opens a dialog to import existing Class Types. Imports a planned Class Type definition from a file which is XML-formatted and must be signed. Only available in edit mode. |
Add Class Type Bandwidth | Add a Class Type bandwidth to the list of Class Type Link Bandwidths. You need to configure the new entry in the table of Class Type Link Bandwidths. Only available in edit mode. | |
Remove Class Type Bandwidth | Remove a selected Class Type bandwidth from the list of Class Type Link Bandwidths. Only available in edit mode. | |
Help |  | Calls the help viewer and opens this page. |
Exit | Quit HQoS Configuration Manager. |
Name | Specify a Name for the selected Class Type. Note: The Name must be unique and shall not contain characters like [ ] / | * ? { } = |
Description | Specify a description for the selected Class Type. |
Pick Color | Select a color for this Class Type (used for display purposes). |
Scheduling | Specify the scheduling type: - Don’t Care (use any type), - Strict (use strict scheduling), - WRR (use weighted round robin scheduling). |
Traffic Class | Specify classes for traffic by entering a comma separated list in the range 0…7. Example: 0,1,2,3,4,5 |
Network Control | Specify classes for network control by entering a comma separated list in the range 0…7. Example: 6,7 |
Model | Select from the two hierarchy models: - RDM (Russian Doll Model), - MAM (Maximum Allocation Model). |
Service Category | Select one or several of the available service categories, e.g.: - General (used for traffic services), - Transparent Clock (used for PTP services). To choose, click on the “Select Service Category” icon, then mark the appropriate service category or categories from the list and click “OK”. |
Related dialogs / windows
Service Profile (depends on license option),