
Split Link
Purpose
Allows you to insert an NE into an existing link by splitting the link into two parts, inserting the NE, connecting the new links, and re-connecting the previous tunnels and services. While using protected tunnels this can be done without service interruption. Requires Expert Mode.
You will need an NE that is:
• of the same type as the existing A End and Z End NEs (FOX61x),
• member of the ENP domain,
• fully commissioned with at least two MPLS-TP interfaces configured having the same physical layer characteristics as the MPLS-TP interfaces on both sides of the existing link,
• in operation (or ready to be put into operation), and
• ready to be physically inserted between the previous A End and Z End NEs.
Splitting a link without service interruption can only be executed for protected services. In this case the services will run over the redundant (protection) link that remains untouched. Meanwhile the other (working) link can be split and reconnected via an inserted NE, and the services can be switched back to the new (working) links when both the changes in the ENP and the physical implementation have been completed, and the new links are up and running.
For unprotected services (tunnels) running over a link that shall be split, a service interruption cannot be avoided.
The procedure of splitting an existing link and inserting a new NE is described below.
Dialog images
Split Link
Manage Tunnels
Procedure to split a link / insert an NE into an existing link
To split an existing link and insert an NE into the existing link,
Proceed as follows:
1. Make sure you have activated the ENP Expert Mode (see ENP - Options - Expert Mode).
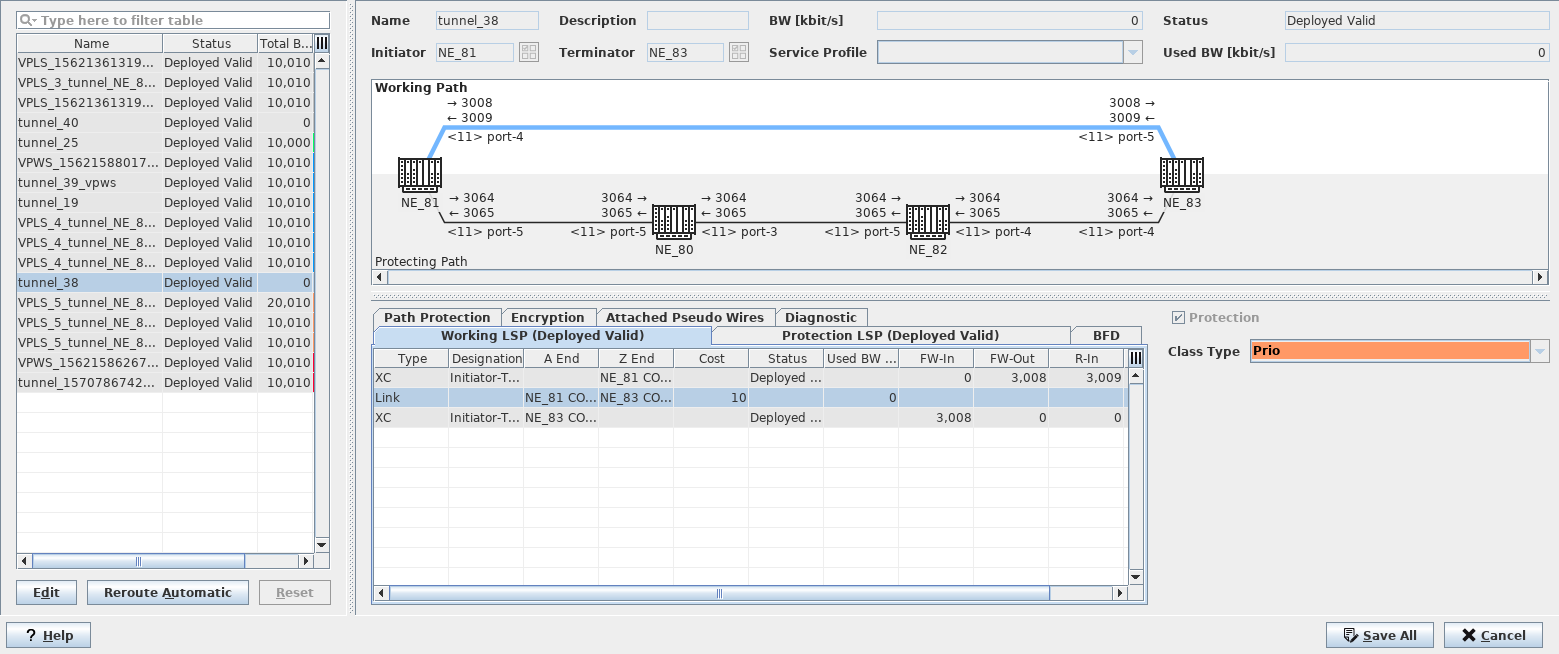
2. Make sure all services (tunnels) that need to run without interruption are actually running over the protecting link(s), and not over the link that shall now be split. To see a list of all tunnels on the link, select the link from the ENP Main Window, and choose “Manage Tunnel…” from the context menu.
• If you want to manually switch over protected tunnels to the unaffected LSP, select the tunnel from the list, and execute a “Manual Switch” command in the “Path Protection” tab. After this you can close the “Manage Tunnel” dialog.
3. Select the link to be split from the list of links (see Link tab) of the ENP main window.
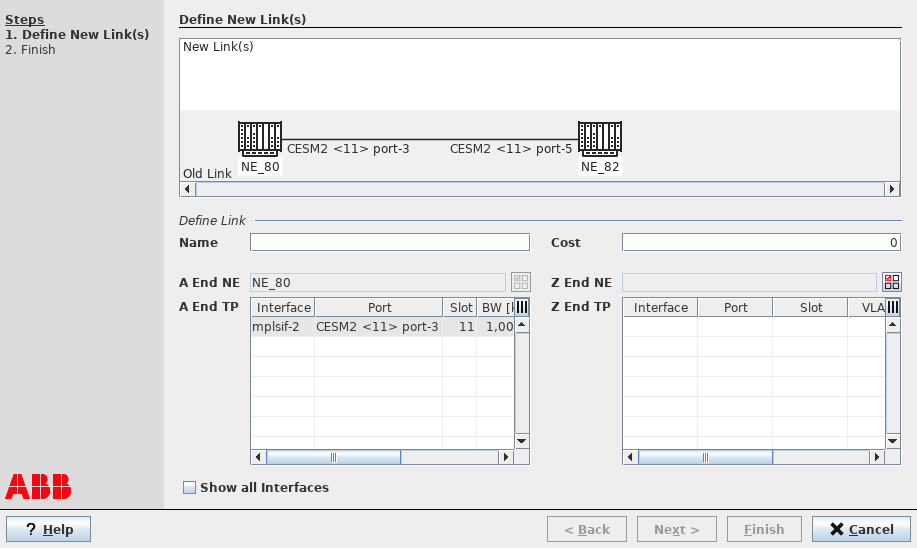
4. Choose “Split Link” from the context menu. This will open the “Split Link” dialog.
5. For the new link (first part) enter a suitable name in the “Name” field.
6. Enter the correct cost for the new link (first part) in the “Cost” field.
7. Click on the Z End NE selection icon, select the new Z End NE (which will be the new inserted NE), and confirm with OK.
8. From the list of Z End TPs (interfaces) of the Z End NE select the suitable Z End TP (interface).
9. Click the “Next >” button.
→ This will show the new link (first part) as a dashed line in the graph. You will now have to define the second part.
10. For the new link (second part) enter a suitable name in the “Name” field.
11. Enter the correct cost for the new link (second part) in the “Cost” field.
12. Click on the Z End NE selection icon, select the Z End NE (which should be the previous Z End NE), and confirm with OK.
13. From the list of A End TPs (interfaces) select the suitable A End TP (interface) of the newly inserted NE.
14. From the list of Z End TPs (interfaces) select the suitable Z End TP (interface), which should be the previous, original Z End TP (interface).
15. Click the “Next >” button.
→ This will show the updated graph with the new links (dotted lines) and inserted NE added.
→ In the table below the graph, the new links will be listed accordingly.
→ As a default the “Open Manage Tunnel?” option is enabled. This will automatically open the “Manage Tunnels” dialog upon clicking the “Finish” button.
16. If everything is correct, click the “Finish” button, otherwise use the “< Back” button to do required modifications.
→ If you have the NEM Network Browser (map) open, the map view will be updated with the new NE inserted and new links created.
→ If enabled in the previous dialog, the “Manage Tunnels” dialog will be opened for the original, non-split link with all tunnels listed that were previously running over the original link (also see Manage Tunnel…). When selecting any of these tunnels in the list of tunnels you will see the statement “Missing Section” in the Status column of the Working LSP.
17. In the “Manage Tunnels” dialog select all tunnels in the tunnel list in the left hand table and click the “Reroute Automatically” button.
→ A dialog will be opened for confirming the removal of the base link and automatic rerouting of the tunnel over the new links.
18. Click “Yes” if you want to confirm the removal of the old link from the configuration and the automatic rerouting of the selected tunnels over the new links.
→ This will build the new tunnels over the inserted NE and update the graph and LSPs accordingly. The status of the working LSP XCs will show “Deployed Modify”, or “Unsaved”, respectively.
19. Click “Save All” to save the changes to the database.
→ This will update the tunnel graph with the settings for the End NEs (Initiator-Terminator) to “Deployed Valid”, and will leave the newly inserted NE (Transit) in the status “Saved OK”.
20. Select all tunnels in the tunnel list in the left hand table (with status “Deployed Invalid”) and click “Deploy” from the context menu to deploy the tunnel changes to the network. Confirm the deployment.
• Deployment will take some time, depending on the number of tunnels that are being rerouted.
→ When all tunnels have been deployed, the corresponding alarms that had been activated due to the changes in the network, are being cleared.
Result: The link has been split, the new NE has been inserted, the tunnels (and protection LSPs for the services) have been rerouted without service interruption for the services running over protected tunnels, and the network is alarm free again as soon as the physical implementation has been completed and the services are switched back from Protection LSPs to Working LSPs for tunnels with revertive protection mode.
End of instruction
Related dialogs / windows
Link tab,