
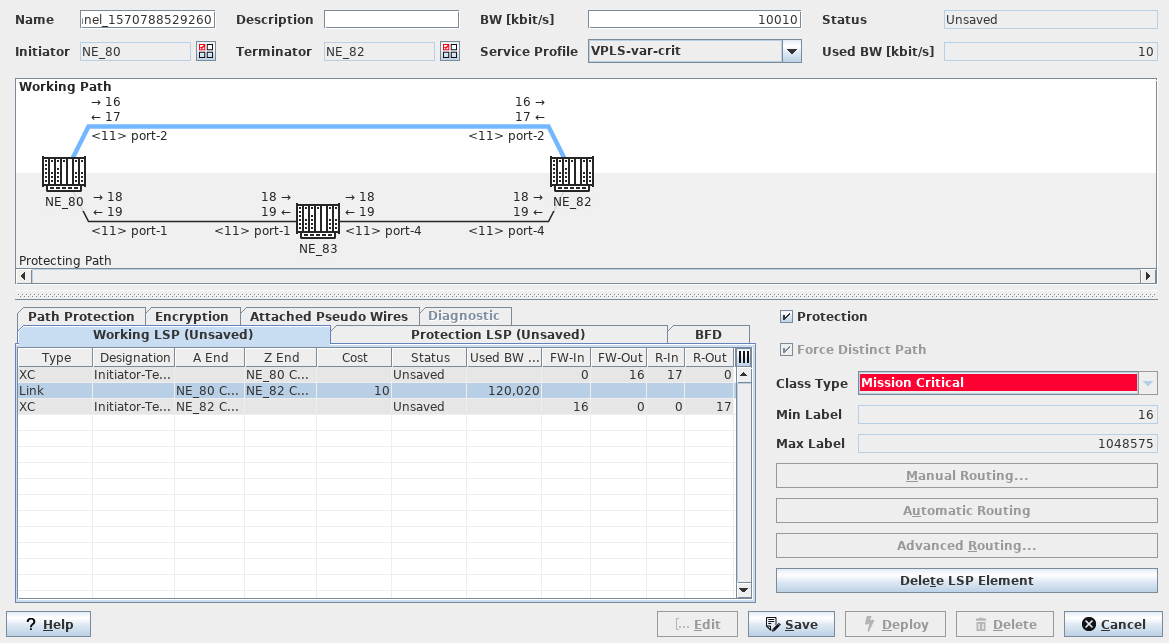
Create Tunnel
Purpose
Allows you to create a tunnel with working and optionally protection LSP. The LSPs can be created via Manual or Automatic Routing.
The created LSPs are co-routed bidirectional LSP. This means the forward and reverse directions of a bidirectional LSP follow the same path, that is the same nodes and links from nodes A to Z or from nodes Z to A.
While creating a tunnel, the elements are added to the tunnel graph in the upper part of the dialog window as you proceed with setting the required parameters.
For any node that is added to the LSP graph you can use the context menu to:
• open the “NE Details” dialog;
• open the node configuration; select “Configuration - <user class>”. Depending on the user class you will have a specific permission level on the node.
During tunnel configuration, the path bandwidth, Bidirectional Forward Detection (BFD) session to detect failure condition on the path, and the path protection parameters can also be configured.
With the respective license option activated and the required infrastructure installed, you can create encrypted tunnels. For more details refer to the user manuals for the encryption key manager DIRAC, and for the SENC1 series encryption units (SENC1‑4, SENC1F4, SENC1‑8 or SENC1F8).
Please refer to LSP Path Calculation for background information.
This section includes the following major sub-sections:
Dialog image
Create Tunnel
Mandatory entries
Tunnel Name
Initiator
Terminator
Optional entries
Description
BW [kbit/s]
Service Profile
Protection
Force Distinct Path
Informational content
Status | - Incomplete: Either mandatory parameters are not yet fully entered or selected, or the routing is not yet complete, i.e. there is a Hole in the path. The tunnel is not yet saved in the FOXMAN‑UN database. - Unsaved: The path is complete but the tunnel is not yet saved in the FOXMAN‑UN database. - Saved: The tunnel is saved in the database but some nodes or links are missing. - Saved OK: The path is complete and the tunnel has been saved in the FOXMAN‑UN database. The tunnel can now be deployed. - Deployed Valid: The path is complete and the tunnel is saved in the FOXMAN‑UN database as well as deployed in the nodes. - Deployed Invalid: The tunnel is saved in the database as well as deployed in the nodes. Some nodes could not be deployed or some nodes and links are missing. |
Used BW [kbit/s] | The total bandwidth allocation of the deployed services using this tunnel. Note: Service bandwidth allocation is currently not supported. |
LSP Graphical View | The LSP graph shows graphical symbols of NEs and LSPs with NE Name, unit and port of the link carrying the LSP, and FW-IN, FW-Out, R-In, and R-Out labels. For Tunnels with Protection enabled both the Working LSP and Protection LSP are shown. For deployed tunnels the currently active LSP background is shaded white if the status can be read. Either the label “Working Path” or “Protecting Path” is bolded to indicate the current selection. The LSP of the currently selected LSP tab (Working or Protection) is colored. For tunnels with encryption see more details in Encryption. You can zoom in and out in the LSP graph by using either - the “CTRL” key and the mouse wheel, or - the “CTRL” key and the plus (+) and minus (-) keys of the keyboard. Note: The “CTRL” key may also be named “Strg” on some keyboards. When zooming out some or all of the labels are not displayed any more. |
Controls (buttons, menu items, etc.)
Name | Specify a Name for the tunnel. |
Description | Enter a description for the tunnel. |
BW [kbit/s] | Enter the tunnel bandwidth in kbit/s. |
Initiator / Terminator  | Calls the Select Initiator/Terminator NE dialog. Once an Initiator or Terminator has been selected the NE symbol is added in the upper part of the dialog window (if enabled in the Global Preferences). |
Select any previously created service profile. Note: When a Service Profile is selected, parameters such as BW [kbit/s], Protection, and Class Type are applied as defined in the service profile. When parameters are defined as “fixed” in a service profile they cannot be modified any more during tunnel creation. Parameters defined as “variable” can still be modified during tunnel creation. | |
Protection | Click the checkbox to activate the Protection LSP tab, Path Protection tab and BFD sessions. This cannot be modified when a Service Profile with fixed settings is used. Note: When a service profile has protection defined as “fixed”, protection cannot be enabled or disabled during tunnel creation. In this case you would need to create and apply a service profile with protection enabled (or disabled, according to your requirements), or with protection defined as “variable”, which would allow you to enable or disable it during tunnel creation. |
Force Distinct Path | Force the routing algorithm to select a distinct path for the protecting LSP. Cannot be modified when a when a Service Profile with fixed settings is used. |
Class Type | The specified the Class Type as configured in Class Type (HQoS Class Type Definition), and applied to the Service Profile. This cannot be modified when a Service Profile is used. |
Min Label | Enter the minimum tunnel label. Default is 3000. |
Max Label | Enter the maximum tunnel label. Default is 1048575. It is however recommended to use tunnel labels that are smaller than the PW Min Label to avoid conflicts with the PW label range. |
Allows the user to route the LSP manually. Once routing is completed the path is added to the graphical diagram. For protected tunnels routing needs to be executed on both Working LSP and Protection LSP. Calling this command on a “Hole” will open the Next Hop dialog, which lists all possible MPLS-TP links to reach the next-hop node. | |
Starts the Automatic Routing based on the cheapest route from Initiator to Terminator. Once routing is completed the path is added to the graphical diagram. For protected tunnels routing needs to be executed on both Working LSP and Protection LSP. Note: If a “Tunnel” template is used: Starts the Automatic Routing based on the template’s configured automatic routing parameters. Please refer to Advanced Routing for parameters’ details. | |
Calls the Automatic Routing Parameters dialog. For protected tunnels routing needs to be executed on both Working LSP and Protection LSP. The dialog’s “Route” button creates a complete LSP automatically based on the configured routing parameters. Once routing is completed the path is added to the graphical diagram. | |
Delete LSP Element | Removes the LSP elements from the Path; only possible in Edit mode. This command is called from the context menu of the selected LSP element(s) of the Working LSP or the Protection LSP. It is possible to remove - a link, - an NE (node) and a link, - a number of consecutive links from the path. If more than one link is selected, then the nodes between two links are also removed. The removed LSP element(s) are then replaced by a “hole”. Only one “hole” is allowed on the path. When an LSP element is removed from the path, the corresponding link and node resources are automatically released. A hole can be closed again by applying Manual Routing, Automatic Routing or Advanced Routing while in Edit mode. |
Edit | Allows modifying the currently opened tunnel. |
Save | Saves the tunnel in the database. |
Deploy | Deploys the planned (saved) tunnel to the nodes. |
Delete | Deletes the currently opened tunnel. |
Cancel | Closes the dialog without creating the tunnel. |
Help
? Help | Calls the help viewer and opens this page. |
Table Sorting and Filtering/Export and Printing
Please refer to Table Sorter section for details.
Related dialogs / windows
Service Profile (depends on license option),