
Create Service Profile
Purpose
This wizard supports you in creating service profiles for use with VPLS or VPWS. The “Service Profile” tab is only available, and creation of service profiles is only possible if you have purchased a TE service profile license option.
Please note:
Depending on the license options you may not see the “Service Profile” tab. If you have acquired a service profile license the service profiles will appear in the “Service Profile” tab of the ENP main window.
If you want to create a service profile supporting asymmetric VPLS (i.e. with per-port rate limiters) you need to select Ingress Rate Limiting, Type = “2 Rate - 3 Color” and set all Ingress Rate Limiting options to “Variable” instead of “Fixed”. When creating a service based on that profile, you will be able to set individual ingress rate limits per service port. Alternatively, you will be able to activate / deactivate rate limiting per port.
Dialog image
Create Service Profile
Mandatory entries
Not applicable.
Optional entries
The creation of service profiles is optional.
For each of the parameters the setting can be “Fixed” or “Variable” in the following dialogs, depending on the selection on the right hand side of the parameter field:
• When set to “Fixed” the respective parameter of the service cannot be modified when the service profile is applied. As a consequence none of the service parameters with the “Fixed” option can be changed unless the service is re-created.
• When set to “Variable” the respective service parameter can be modified after the service profile has been applied to the service. This is used to cover use cases where certain parameters do not necessarily need to be fixed to a specific setting.
Controls (buttons, menu items, etc.)
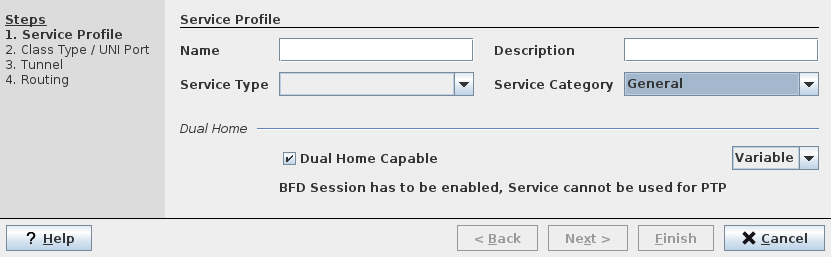
Step 1: Service Profile
Name | Specify a Name for the Service Profile. Note: The Name must be unique and shall not contain characters like [ ] / | * ? { } = |
Description | Specify a description for the Service Profile. |
Service Type | Select the service type: - VPLS for Virtual Private LAN Services, - VPWS for Virtual Private Wire Services. Note: If the dialog is called via “Create Service Profile Based on… [an existing Service Profile]” the service type is already preselected. |
Service Category | Select the service category from the two options - General (used for VPLS or VPWS), - Transparent Clock (used for PTP). |
Dual Home (parameters group): | |
Dual Home Capable | Can be enabled or disabled. For General services the “Dual Home Capable” option is enabled by default; for “Transparent Clock” services the “Dual Home Capable” option is always disabled. When enabled, the service profile allows you to create PE Dual Home capable services. |
(Parameter change option) | This option determines whether the parameter can be changed when the service profile is applied to a service. - Fixed (parameter is fixed during service creation), - Variable (parameter can be changed during service creation). Note: For General services the “Dual Home Capable” option is enabled by default, and the parameter change option default is “Variable”. For “Transparent Clock” services the “Dual Home Capable” option is disabled, and the parameter change option default is “Fixed”. |
? Help | Calls the help viewer and opens this page. |
Next > | Calls the Step 2 Window. |
Cancel | Closes the dialog without creating the service profile. |
Step 2: Class Type / UNI Port
Class Type | Specify the Class Type; select from: - Default - any other defined Class Type as configured in Class Type (HQoS Class Type Definition). |
Pseudo Wire BW [kbit/s] | Specify the required bandwidth in kbit/s for the Pseudo Wire(s) carrying the service. Note: The Pseudo Wire BW is also used implicitly for the creation of the tunnel. However the operator is enabled to overwrite at service creation the Tunnel BW with a value which is greater than the Pseudo Wire BW. This may be useful when multiple Pseudo Wires need to be routed over one tunnel. |
Ingress Port QoS
Trust Mode | Use the trust mode to apply preselected settings for - CoS Type, - CoS Overwrite. The following settings are preselected. Untrusted: - CoS Type = Interface, - CoS Overwrite = Overwrite. Trust Layer 2: - CoS Type = PCP, - CoS Overwrite = Maintain. Trust Layer 3: - CoS Type = DSCP, - CoS Overwrite = Maintain. Note: If you modify any of the preselected settings after setting the Trust Mode the Trust mode will be reset. |
CoS Type | Specify a CoS Type: - Interface, - PCP, - DSCP. Note: - If you modify the CoS Type after setting the Trust Mode the Trust mode will be reset. |
Default Priority | Select the default priority for the service in the range 0…7. |
Ingress CoS for VLAN Based services
CoS Overwrite | Specify the CoS overwrite mode: - Overwrite, - Maintain. Default is “Maintain”. If “Maintain” is selected, no CoS overwrite will be applied, and the “overwrite Priority” will not be used. Note: If you modify the CoS Overwrite after setting the Trust Mode the Trust mode will be reset. |
Overwrite Priority | Select the overwrite priority for the service in the range 0…7. |
Ingress Rate Limiting
Enable Rate Limiting | Specify whether Rate Limiting shall be enabled or disabled for this profile. |
Type | Use the rate limiting type to apply preselected settings for CIR, CBS, EIR, and EBS. The following types are available: - 1 Rate – 2 Color, - 1 Rate – 3 Color, - 2 Rate – 3 Color. |
Committed Information Rate [kbit/s] (CIR) | Specify the CIR in kbit/s for this profile. Note: For VPWS profiles the CIR is set when you enter the Pseudo Wire BW [kbit/s]. |
Committed Burst Size [Bytes] (CBS) | Specify the CBS in bytes for this profile. |
Excess Information Rate [kbit/s] (EIR) | Specify the EIR in kbit/s for this profile. Note: Depending on the selected rate limiting type this parameter is fixed or may not available for modification. |
Excess Burst Size [Bytes] (EBS) | Specify the EBS in bytes for this profile. Note: Depending on the selected rate limiting type this parameter is fixed or may not available for modification. |
Egress Scheduling Profile
Scheduling Profile | Select the applicable egress scheduling profile from the 5 available profiles (1…5). Note: Scheduling Profiles need to be configured per node via the local craft terminal in the “NE – QoS – Scheduling Profiles” dialog before they can be applied here. Scheduling Profiles can be distributed to the NEs with the ENP Audit function. See Schedule Network Audit, Schedule Network Alignment, Network Audit Result, and Manage QoS Reference Tables from the ENP Tools menu. |
? Help | Calls the help viewer and opens this page. |
< Back | Go back to Step 1 Window: Service Profile. |
Next > | Calls the Step 3 Window: Tunnel. |
Cancel | Closes the dialog without creating the service profile. |
Step 3: Tunnel
Protection | Enable or disable protection for the tunnel that is carrying the service. Note: Disabling protection also disables Force Distinct Path, Protection Mode, WTR Time [s], and State Change Tx Interval [ms]. |
Force Distinct Path | Enable or disable enforcement of a distinct path for the protecting LSP. Not available when Protection is disabled. |
BFD
BFD Session | Enable or disable BFD session for the tunnel that is carrying the service. Only selectable when Protection is disabled. Always enabled when Protection is enabled. |
CC Interval | Select the Continuity Check (CC) Interval from the following possible values: 3.3, 10, 20, 30, 40, 50, 100, 1000 ms. Default is 100 ms. Only selectable when BFD Session is enabled. |
LPS
Protection Mode | Select the protection mode: - Non revertive, - Revertive (switching back to default if the working path is available again). Only selectable when Protection is enabled. |
WTR Time [s] | Enter the Wait To Restore (WTR) Time in the range 0…720 s. Default is 300 s. |
State Change Tx Interval [ms] | Select the transmit interval for state changes from the following possible values: 3.3, 10, 20 ms. Default is 20 ms. |
Encryption
Encryption Profile | Select the Encryption Profile from the following possible profiles: - None: No profile applied; this is the default, - [1] Discard: Discard all traffic, - [3] Encrypted & Authenticated without OAM: Encrypt and authenticate all traffic; do not use OAM, - [5] Encrypted & Authenticated with OAM: Encrypt and authenticate all traffic; use OAM. |
Label
Min Label | Set the minimum tunnel label; default is 3000. |
Max Label | Set the maximum tunnel label; default is 1048575. |
? Help | Calls the help viewer and opens this page. |
< Back | Go back to Step 2 Window: Class Type / UNI Port. |
Next > | Calls the Step 4 Window: Routing. |
Cancel | Closes the dialog without creating the service profile. |
Step 4: Routing
Routing Order | Select the routing order from one of the following: - BW Optimized, - Cheapest, - Shortest. |
Max Hops | Enable or disable a maximum number of hops for routing. When “Max Hops” is enabled, enter the maximum number of hops. The supported range is 1…255. |
Max Cost | Enable or disable a maximum cost for routing. When “Max Cost” is enabled, enter the maximum cost allowed in the range 1…32767. |
Related dialogs / windows