
Hierarchical QoS (HQoS)
HQoS provides means for setting up the MPLS-TP network with differentiated services. With HQoS, a scheduling level is introduced which enables the Hierarchical QoS mechanism. This 2-level scheduling can distinguish service-specific and class-specific traffic and provide BW management when used together with shaping capabilities.
Please note:
The BW enforcement feature availability depends on the HW and SW used in your FOX61x nodes. BW enforcement is required for setting up HQoS in your network.
Please note:
It is assumed that you have already configured a number of nodes and links in your network to which you want to apply HQoS now.
Workflow
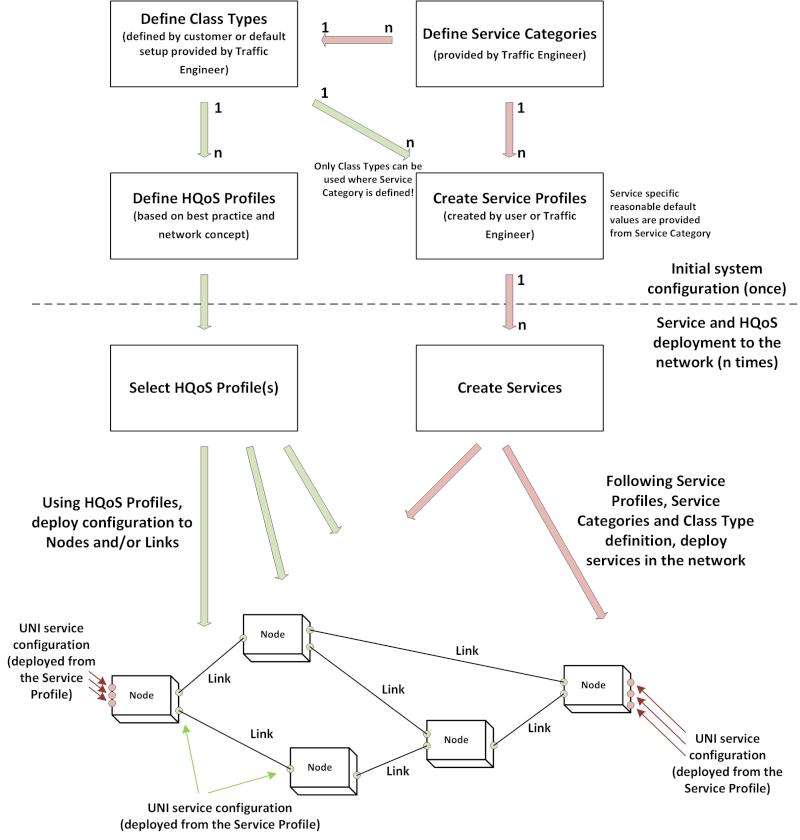
To configure the basics of HQoS, we recommend adhering to the workflow above and the steps as listed below.
Proceed as follows:
1. Define appropriate Service Categories via the “Create Service Category” wizard. This is done by a traffic engineer in the HQoS Configuration Manager, “Service Category” tab (Service Category (HQoS Service Category Definition)):
− Verify that the service categories provided as default are appropriate.
− If required, modify these or create your own additional service categories. When done, save the changes.
2. Define Class Types that you want to use throughout the network. This is done in the HQoS Configuration Manager, “Class Type” tab (Class Type (HQoS Class Type Definition)):
− Go to “Edit” mode, then activate the “Used” checkbox for the Class Types you want to use in your network.
− Fill in the required parameters for each of the Class Types used.
− Select a traffic model (RDM, MAM).
− Save the Class Types.
3. To apply the modified Class Types restart the ENP core. In a terminal execute the following commands:
../bin/private/enpcorestop
../bin/private/enpcorestart
After the ENP Core has restarted you need to re-open the ENP GUI.
4. Create Service Profiles. This is done by the user or a traffic engineer from the ENP main window, “Service Profile” tab.
5. Define the major HQoS profiles, e.g. one for the network core, and one for the network edge. This is done in the HQoS Configuration Manager:
− In the “HQoS Profile” tab (HQoS Profile (Definition)), click on the “Create” (Add a new configuration) button.
− Give it a name, e.g. “Core”.
− Select the appropriate strategy, e.g. “1-rate BW enforcement - drop non-eligible TC packets”.
− In the list of available HQoS profiles select the profile just created. If required, click the “Edit” icon and adjust specific settings of the profile.
− Save the modifications.
− In the “HQoS Profile” tab (HQoS Profile (Definition)), click on the “Create” (Add a new configuration) button to add a second HQoS profile.
− Give it a name, e.g. “Edge”.
− Select the appropriate strategy, e.g. “1-rate BW enforcement - drop non-eligible TC packets”.
− In the list of available HQoS profiles select the profile just created. If required, click the “Edit” icon and adjust specific settings of the profile.
− Save the modifications.
6. Select the HQoS profiles and apply them to your network, i.e. specifically to nodes or links you have set up already. To do this, go to the HQoS Configuration Manager, “HQoS Profile” tab (HQoS Profile (Definition)), select the HQoS profile from the left-hand list, then select the “Network View” tab:
− Click on the “Align” button above the left-hand NE table to add nodes (NEs) to the HQoS profile and/or
− click on the “Align” button above the left-hand Link table to add links to the HQoS profile. Confirm the alignment of the selected item(s) with the current HQoS profile.
− To remove an NE or a Link from the profile usage, select the NE or Link and click the respective “Clear” button above the table. Confirm clearing of the selected item from using the current HQoS profile.
− Confirm the alignment of the selected NEs and/or links with the current HQoS profile. In order to fully align links with that profile, both ends of the links must support BW enforcement.
If a node is not supporting this feature, the HQoS profile with BW enforcement cannot be applied on that end of the link. It will hence be shown as partially enabled.
If the nodes on both ends of the link are supporting BW enforcement the feature will be shown as enabled on the link and on both terminating nodes.
− Repeat these steps with the core profile on the links of your core network, and with the edge profile for edge links of your network.
7. Create Services. This is done ion the ENP, VPWS or VPLS tab via the Create Service wizard.
Result: You have done the basic HQoS setup in your network.
End of instruction
To create services (VPLS, VPWS) with HQoS applied, the above steps need to be done; otherwise you won’t be able to have BW enforcement activated.