Preconfiguration via FOXMAN‑UN
1 Verify that the Ethernet Networking Package and the MPLS-TP nodes are defined and activated in the FOXMAN‑UN license. For full functionality it is also required to have an activated TEServiceProfile license option.
$ lslicense
Please note:
Check the number of nodes for the Ethernet Networking Package defined in the license.
• The total number of MPLS-TP NEs in your network should not exceed 250.
• The total number of ENP services in your network should not exceed 2500.
2 Verify the capability of the Element Agent (EA) to read MPLS-TP data on NEs via $NEM_HOME/etc/mplstp.conf parameter: “mplstp_data_koap_support”.
Please note:
This parameter is enabled by default.
3 Discover or create all the required NEs under the “FOX61EA” type agent(s).
4 Add the required MPLS-TP NEs to the ENP-Nodes domain:
ENP > NE Tab > Edit > Add NEs > “Select the MPLS-TP NEs” > Add to ENP Domain
− The “ENP-Nodes” Domain is automatically created when FOXMAN‑UN is started for the first time. It is possible to change the domain name via $NEM_HOME/etc/mplstp.conf parameter:
enp_node_domain_name ENP-Nodes
− Only MPLS-TP enabled NEs or NEs with defined Global and Node IDs based on requirements described in previous step are accepted as FOXMAN‑UN domain member.
− The number of nodes should not exceed the number of MPLS-TP NEs defined in the FOXMAN‑UN license key.
− When an MPLS-TP NE is added to ENP-Nodes domain, its Global and Node IDs are not possible to be modified via ENP.
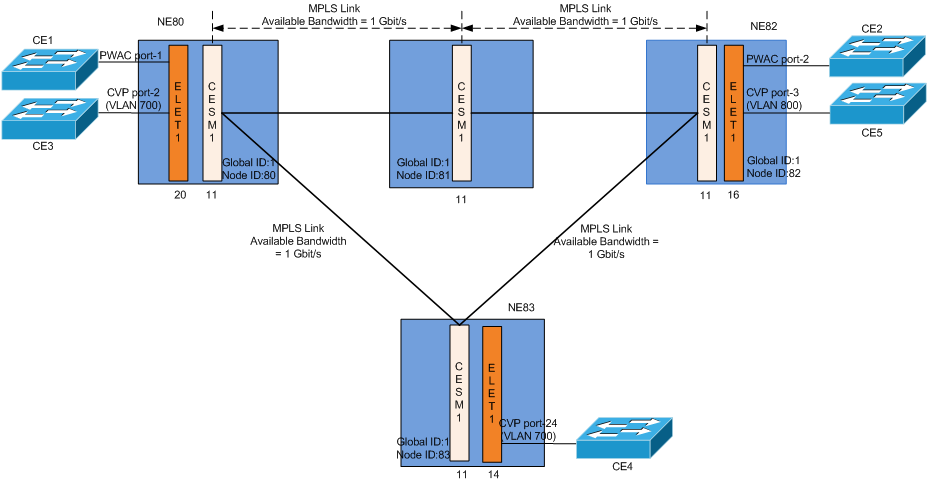
5 Create the required MPLS-TP links:
− The sections are considered MPLS-TP links and added to the ENP Link Tab if both endpoints are MPLS-TP interfaces.
NEM Desktop > Application > Section Management > File > New Section
MPLS-TP Link | Link Speed | Cost | |
|---|---|---|---|
NE80-NE81 | NE80 CESM1 11/4 - NE81 CESM1 11/3 | 1 Gbit/s | 4 |
NE81-NE82 | NE81 CESM1 11/4 - NE82 CESM1 11/3 | 1 Gbit/s | 4 |
NE80-NE83 | NE80 CESM1 11/3 - NE83 CESM1 11/4 | 1 Gbit/s | 4 |
NE82-NE83 | NE82 CESM1 11/4 - NE83 CESM1 11/3 | 1 Gbit/s | 4 |
6 Verify that the MPLS-TP links are reported in the ENP GUI’s Link Tab:
NEM Desktop > Application > Ethernet Networking
Package > Link Tab
− It is possible to change the link’s cost and link’s bandwidth via the ENP Link tab (Link Details).
− The ENP system calculates the available link bandwidth on each LSP path as follows:
Available BW = Link BW - Reserved BW
Where:
− Link (MPLS-TP port) BW is – per default – the link bandwidth computed from the physical port characteristics of the selected MPLS-TP endpoint ports, e.g. NE80’s CESM1 port-4 = 1 Gbit/s.
Please note:
• Over-subscription, the factor in [%], which changes the available bandwidth, is not supported any more as an explicit parameter since the user can determine/modify the link bandwidth in order to achieve over-subscription.
• Reserved BW is the total allocated bandwidth of all configured (saved in the database or deployed) tunnels using this link.
7 Configure HQoS by following the instructions in Hierarchical QoS (HQoS). Note that this requires core units supporting BW enforcement. This feature may not be available with CESM1 or CESM2 core units.
If you prefer not using HQoS, configure Class Types.
8 Create Service Profiles (available only when the TEServiceProfile license option is active):
The Service Profiles are required for appropriate Quality of Service settings in your MPLS-TP network. Service profiles are based on Class Types. For more details please refer to Create Service Profile.
9 Verify that all the nodes’ preconfigurations are reported to ENP:
NEM Desktop > Application > Ethernet Networking Package > NE Tab > Select a node, e.g. NE80 > select “NE Details” from the context menu