
Distribution Wizard
The ESW Distribution Wizard creates ESW distribution jobs and results in ESW distribution tasks. An ESW distribution job is listed in the “Job Management” window. It can have one of the following states:
• Defined
An activated job is in a state where it has a valid definition and has resulted in corresponding tasks.
• Draft
A draft job is not active, e.g. because it has been deleted, but can be used as a template for new tasks.
ESW distribution tasks are listed in the “Task Management” window. An ESW distribution task can have one of the following states:
• Scheduled
A scheduled task has not been executed, but is scheduled for execution at a specific date and time.
• Running
A running task is currently being executed.
• Finished
A finished job has been executed. The execution result can be “successful” or “failed”.
Please note:
The ESW Distribution Wizard does not support ESW distribution to FOX61x units running bootloader software. Only units running application ESW can be upgraded. To install application ESW to units running bootloader ESW use the FOXCST.
Dialog image
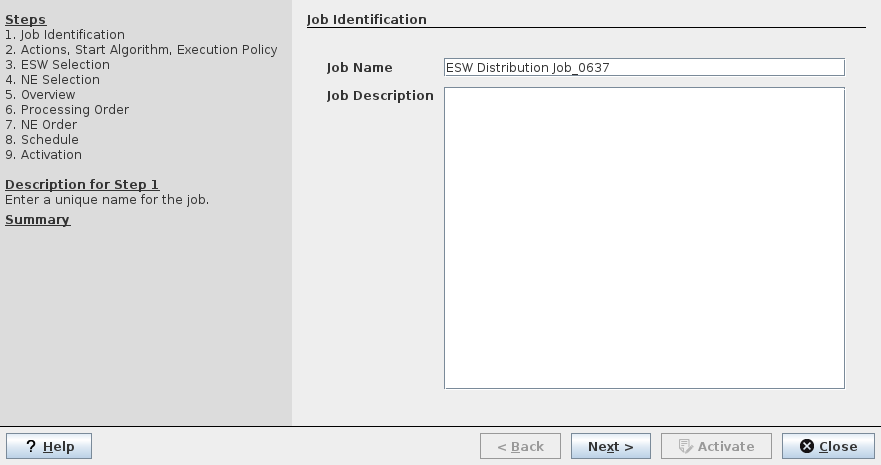
ESW Distribution Wizard
Purpose
This wizard guides you through the 9 steps required to create an ESW distribution job.
To create and activate an ESW distribution job,
Proceed as follows: (steps 1 to 9)
1. Job Identification:
• Use the proposed job name or edit the name to match your requirements.
• Enter a description (optional).
• Click “Next >” to continue or “X Close” to cancel.
2. Actions, Start Algorithm, Execution Policy:
Define actions across all NEs:
• Enable or disable “Download ESW on all Units” (set or clear the mark in the checkbox); when enabled, select one of the following:
- Do not delete ESW before (i.e. before downloading new ESW);
- Delete oldest unassigned ESW before (i.e. before downloading new ESW);
- Delete all unassigned ESW before (i.e. before downloading new ESW).
• Enable or disable starting new ESW on all units (set or clear the mark in the checkbox “Start ESW on all Units”).
Define Start Algorithm (i.e., the algorithm applied for the correct restart sequence per NE); select one of the following:
- Minimal Service Interruption - Revertive EQP
This includes a warning related to NEs not supporting this algorithm will use the start algorithm “System Release Upgrade”. The revertive EQP algorithm will use switch-over to the protecting unit for units installed with equipment protection, and will switch back to the working unit after ESW installation is completed.
- Minimal Service Interruption - Non-Revertive EQP
The non-revertive EQP algorithm will use switch-over to the protecting unit while installing ESW on the working unit and will not switch back to the working unit after ESW installation is completed.
- System Release Upgrade
This algorithm will not specifically minimize service interruption while upgrading the system release ESW on all affected units.
- Unit Upgrade
This algorithm is to be used for single or multiple service units only, without restart of the core unit(s).
Define the execution policy:
• Enable or disable the Execution Policy “Abort on first Error”.
Click “< Back” to go back to the previous step, “Next >” to continue or “X Close” to cancel.
3. ESW Selection:
• There are two options to select the required ESW:
- Select the “Desired System Release” from the drop-down field. This requires a valid system release ESW zip archive. To import a system release, click on “Import ESW…” and import the system release ESW zip archive from the file system where you have stored the archive. The import process will take some time.
Please note:
Importing a system release ESW zip archive requires considerable space in the NEM_DATABASE.
→ To save space in the database only import the system release zip files that are really required.
Once a system release is selected, the related units and their ESW are shown in the “Select ESW” list. If you make any manual changes to the list, the “Desired System Release” will be canceled.
- Select a set of single unit ESW from the list on the right-hand side of the dialog window by marking one or several entries. If no ESW is available, import ESW by clicking on the “Import ESW…” button and navigate to the folder where you have stored the required ESW files. Select file type “*.esw”, then select the required ESW file and click “Open” to upload the file to the NEM database. This steps must be repeated for each ESW file.
After importing ESW files make sure that the selected ESW is as required for each of the activated unit entries in the list.
• Click “< Back” to go back to the previous step, “Next >” to continue or “X Close” to cancel.
4. NE Selection:
• This step shows a list of NEs in your network eligible for ESW installation. If the list is empty, none of the NEs are eligible for installation of the ESW selected in the previous step. This may be due to several reasons such as:
- ESW on all NEs is up to date already,
- none of the NEs uses the selected units / ESW.
• To see the list of all NEs, including those not eligible for ESW distribution with the current settings, mark the checkbox “Show all NEs”.
• In the list of NEs, mark the ones required for the current job. Use the “Mark All” or “Unmark All” buttons to mark or unmark all NEs in the list. Use the “Mark” or “Unmark” buttons to mark or unmark selected NEs in the list.
• Click “< Back” to go back to the previous step, “Next >” to continue or “X Close” to cancel.
5. Overview:
• Shows a list of selected NEs and applicable units with the following information fields under each NE:
- Name: unit address (e.g., unit-1),
- HW Name (e.g., CESM3),
- HW Key,
- Board ID,
- Current ESW Name,
- Current Release/ESW,
- Desired Release/ESW,
- ESW Deletion,
- ESW Download,
- ESW Start,
- Start Algorithm (MSI = Minimum Service Interruption),
- Release Compatibility,
- EQP Compatibility,
- Upgrade Compatibility,
- Downgrade Compatibility.
• In the “Desired Release/ESW” column of the list, select the ESW to be installed on each applicable unit via the drop-down field in the table, if required, or use the proposed entry.
• The command “Set Default ESWs” will reset all values in the “Desired Release/ESW” column to default values. Execution of the command must be confirmed by the user.
• To prevent compatibility checks as required, set a mark in any of the checkboxes
- Release Compatibility,
- EQP Compatibility,
- Upgrade Compatibility,
- Downgrade Compatibility.
• Click “< Back” to go back to the previous step, “Next >” to continue or “X Close” to cancel.
6. Processing Order:
• Select the “Processing Order of NEs” by choosing one of the two options:
- Process all NEs in sequence (no grouping). The sequence will be shown in the next step.
- Assign NEs to sequentially processed groups. When selecting this option, you may use the default number of NEs per group (2) or set a required number of NEs per group (depending on the total number of NEs selected in step 4). This option is suitable e.g. in case of in-band management for specific NEs which requires a stable management connection via gateway NEs during ESW delivery and installation. The Sequence will be shown in the next step.
• Click “< Back” to go back to the previous step, “Next >” to continue or “X Close” to cancel.
7. NE Order:
• In “Sequentially processed groups of NEs” the NE groups are shown with a default arrangement of NEs per group. The number of groups and the number of NEs per group depend on
- the number of NEs selected in step 4,
- the number of NEs per group selected in step 6.
• If all NEs shall be processed in sequence, only one group including all NEs is shown.
• If NEs are assigned to sequentially processed groups, and the number of NEs per group is smaller than the total number of NEs, several groups are shown. These groups will be processed in sequence, i.e. once the job will be executed, NEs in group 1 will be processed in parallel, but before NEs in group 2, etc.
• You can now rearrange any NE within a group, move an NE to a different group or park an NE in the “Group of unassigned NEs” field. Do this with the pointing device by dragging and dropping the NEs listed in any of the groups.
• Click “< Back” to go back to the previous step (only possible if the “Group of unassigned NEs” is empty), “Next >” to continue or “X Close” to cancel.
8. Schedule:
• If the start of the first selected action of the job shall depend on a predecessor job, mark the checkbox “After a predecessor job” and select the required condition in the drop-down field from a list of previously created jobs. If no jobs exist, the list will be empty.
• Depending on the selected actions from step 2, you can now define further details (a “Schedule of Actions”, and “Conditions of Actions”) for these actions.
• Schedule of Actions:
- Immediately (after selected predecessor job, if enabled), or
- At a specific Date and Time: enter a date and a specific time for the action. Note that the time selected will be the start time of the job execution.
• Condition of Actions:
- Enabled or disable the condition “Execute only if <previous action> successfully completed” if applicable. The <previous action> depends on your settings and can be, e.g., a predecessor job or an ESW download.
• Click “< Back” to go back to the previous step, “Next >” to continue or “X Close” to cancel.
9. Activation:
• If required, select the option to launch the task viewer by setting a mark in the ‘Launch the “Task Viewer” upon <Activate>’ checkbox. This will open the “Task Management” window after activation of the job.
• Click “< Back” to go back to the previous step, “Activate >” to activate the job or “X Close” to cancel.
→ After clicking “Activate”, a confirmation is required to activate the job. When selecting “Yes”, the job will be activated; “No” or “Cancel” will get you back to the wizard step 9.
Result: After confirming activation, an information on successful job activation is issued, the ESW Distribution job is activated and the related task(s) is (are) started.
End of instruction
Controls (buttons, menu items, etc.)
? Help | Starts the FOXMAN‑UN help viewer and opens this page. |
< Back | Go back to the previous step of the wizard. Button only active if the conditions to go back are fulfilled. |
Next > | Proceed to the next step of the wizard. Button only active if the conditions to proceed are fulfilled. |
Activate | Activate the distribution job. Button only active if the conditions are fulfilled. |
X Close | Closes the dialog, asking for confirmation to - save your current changes (“Yes”), - close without saving the changes and without creating a job (“No”), or - cancel closure of the wizard and continue job creation (Cancel”). |
Related dialogs / windows