
Create a Virtual Private Wire Service (VPWS)
The Virtual Private Wire Service (VPWS) Pseudo Wire connects two PWAC ports together.
The sample configuration will bind the VPWS to a tunnel (named Tunnel A in this example) without Protection.
Please note:
For background information, refer to Overview of VPWS Implementation
For detailed descriptions of all the mandatory and optional parameters, please refer to section Create Service.
ENP > VPWS Service Tab > Edit > Create Service >
1 (a) Define Service:
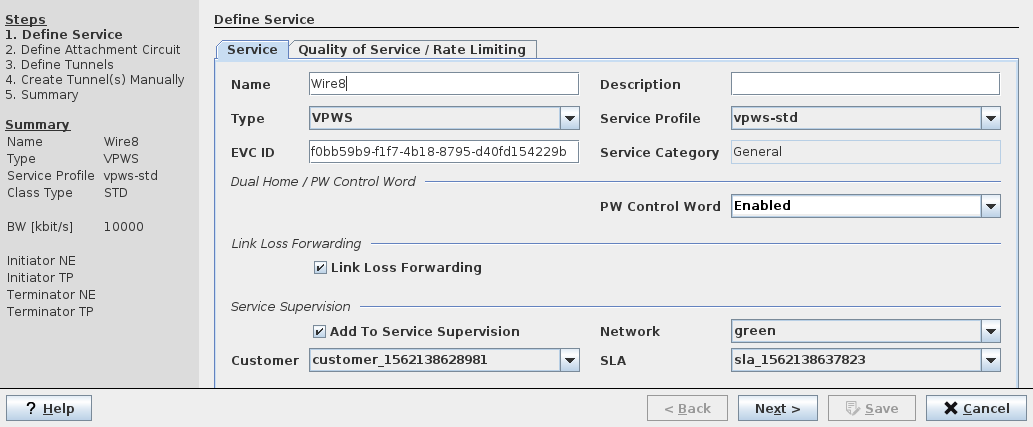
→ Enter required values for the mandatory parameters, i.e.
− Name: Accept the automatically generated name, or enter your own VPWS name, e.g. VPWS_NE80_NE82
− Type: VPWS (this is the default in this dialog)
− Service Profile
→ Enter the values for optional parameters
− Description
→ If required, set a mark in the “Add To Service Supervision” checkbox, and
→ select Network, Customer, and SLA (Service Level Agreement).
1 (b) Define Quality of Service / Rate Limiting:
Note:
Some of the parameters may not be selectable when a Service Profile is used.
→ Select the CoS Type.
→ Select the Default Priority (0…7).
→ Select CoS Overwrite.
→ Select Overwrite Priority.
→ Enable Rate Limiting if required.
→ If Rate Limiting is enabled, enter the CIR, CBS, EIR, and EBS values (or leave them on their defaults).
→ Select the Scheduling Profile (1…5). The 5 scheduling profiles are as configured via the FOXCST (NE – QoS – TC Scheduling Profiles – Profile 1…5). Profile 1 is always a strict priority profile.
→ Click “Next” button
2 Define the Attachment Circuit:
(a) Tab “Attachment Circuit”:
→ Select the mandatory parameters, i.e.:
− Initiator AC: NE_80 ELET1 <20> port-1.
− Terminator AC: NE_82 ELET1 <16> port-2.
− Initiator/Terminator Type: AC Port Based, No Change.
→ Where required enter the VLAN IDs, i.e.:
Note:
Whether or not the VLAN IDs need to be entered depends on the selected Type.
− Initiator AC VLAN,
− Initiator PW VLAN,
− Terminator AC VLAN,
− Terminator PW VLAN.
For the type “AC Port Based, No Change” no VLAN ID is entered.
“Show all ports” also shows ports that are not suitable for being added. This is for information purposes only.
(b) Tab “Pseudo Wire”:
A new Pseudo Wire (PW) with default parameters is automatically created connecting the two PWAC ports.
→ Use the default parameters for the following parameters:
− Min Label / Max Label,
− BW [kbit/s]; the bandwidth can be set as required.
(c) Tab Port Rate Limiter:
Rate limiter settings can be done here, provided that the ingress rate limiting parameters of the service profile used for this service have been set to “Variable”.
− From the list of ports, select any of the two ports that are part of the service.
− On the right-hand side of the dialog, enter the required port specific rate limiting values (CIR, CBS, EIR, EBS).
− If rate limiting shall not be applied to the selected port, disable port rate limiting by removing the mark in the “Enable Rate Limiting” checkbox.
− Do these steps for both ports as required, or leave the settings as defaulted by the service profile.
→ Click “Next” button.
3 Define Tunnel(s)
→ Click on the Tunnel icon to choose among manual and automatic tunnel creation.
→ Depending on the tunnel routing status, click the “Automatic Routing” or “Next” button.
4 Create Tunnel(s) Manually
Where required, route the tunnels manually. For this purpose, select the appropriate tunnel end points.
− When done, click “Next” to get back to the “Define Tunnels” (step 3) view.
Note:
If any of the existing tunnels or “create automatically” option is selected, the Wizard will proceed directly to the final step “Summary”. If “create manually” is selected the tunnel(s) need to be selected in the next step.
5 Summary
Shows a summary of the settings done in the previous steps.
→ If you need to make modifications, go back to previous step.
→ If the service definition is as required, click “Save” to save the service to the database.
→ To deploy the service to the network, select the saved service in the list of VPWS services, then select “Deploy VPWS” from the icon list or from the context menu. The following sequence is checked:
− checks that the LSP is still valid,
− adds configuration to devices,
− validates that the configuration is accepted and the tunnel is up.