
Routing
1 From the Application dialog, select the new TEs.
− Note that TE Status is still Incomplete.
− The Working Path of the selected TE displays “Hole”. This means the routing has not been completed by the user.
2 Select the Routing:
− If Automatic Routing is selected, the NP completes the Route based on the user’s previously configured Automatic Routing Parameters.
(Main NP Window > Options > Set Auto Routing Parameters)

Routing: Manual Routing or Automatic Routing
− If Manual Routing is selected, the “Next Hop” dialog is called. The user has to manually select each “Hop” until the path is complete.

Manual Routing: Selecting the “Next Hop”
3 NP generates Trails depending on the Layer (e.g. P12) and Local and Remote TP selected to complete the Path. When the Path is complete, the selected TE’s Working Path changes from “Hole” to list of “LC(s)” or Link Connection(s) with “undefined” channels.
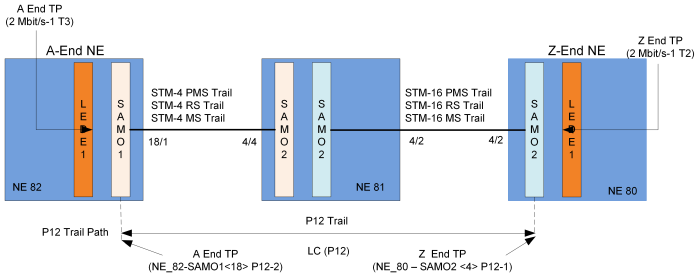
P12 Trail and Termination Points
Please note:
The diagram illustrates only the P12 Trail and its TPs, which are displayed in the Working Path GUI as shown in Figure Channel Selection.
Clicking the “Details” context menu will display all the generated Trails and their TPs, e.g:
→ Topological Trails (STM4/16 - PMS, RS and MS Trails),
→ VC4 Trail,
→ VC12 Trail,
→ P12 Trail.