
Integration Steps
To integrate FOXMAN-UN with AD,
Proceed as follows:
Integration of the Linux server with AD:
Please refer to the following RHEL document for a complete description of the steps needed to integrate the Linux server with the AD server:
Chapters 1.4.1 and 1.4.2.1 are particularly important:
• 1.4.1: “Discovering and joining an AD Domain using SSSD”
• 1.4.2.1: “Automatically generate new UIDs and GIDs for AD users”
Like with the document in [1], we recommend integrating FOXMAN-UN with AD by using SSSD with option “using ID mapping” to automatically generate new UIDs and GIDs for AD users.
Configuring the file /etc/sssd/sssd.conf:
Optional: add the following parameters in Domain section:
ad_gpo_access_control = disabled
ad_gpo_ignore_unreadable = True
By default, ad_gpo_access_control is enforced, i.e., GPO are evaluated and enforced. Admin must define the GPO settings on RHEL and create and configure a GPO for a RHEL host in the AD GUI as per [1] Red_Hat_Enterprise_Linux-9-Integrating_RHEL_systems_directly_with_Windows_Active_Directory-en-US (Red Hat online product documentation).
Leaving the default can prevent the SSH and GIU login.
As initial configuration for non-AD experts we suggest to disable the use of GPO.
Change in Domain section: set the following parameters to the values:
use_fully_qualified_names = False
fallback_homedir = /home/%u
The content of the file sssd.conf (using a sample domain name here) should look like:
[sssd]
domains = EXAMPLE.COM
config_file_version = 2
services = nss, pam
[domain/EXAMPLE.COM]
ad_server = win-test.example.com
ad_domain = EXAMPLE.COM
krb5_realm = EXAMPLE.COM
realmd_tags = manages-system joined-with-adcli
cache_credentials = True
id_provider = ad
krb5_store_password_if_offline = True
default_shell = /bin/bash
ldap_id_mapping = True
use_fully_qualified_names = False
fallback_homedir = /home/%u
access_provider = ad
ad_access_filter = (&(memberOf=cn=admins,ou=groups,dc=example,dc=com)(unixHomeDirectory=*)
ad_gpo_access_control = disabled
ad_gpo_ignore_unreadable = True
Configuration of the FOXMAN-UN users in the windows AD server:
Before the FOXMAN-UN installation, you need to add to the windows AD server the FOXMAN-UN security administrator user:
username: “nemsecadm”
home dir: “/opt/nem/nemsecadm”
shell:”/bin/bash”
primary group: “nem”
Before the DIRAC installation, you need to add to the windows AD server the dirac FOXMAN-UN user:
username: “dirac”
home dir: “/opt/dirac/dirac”
shell: “/bin/bash”
primary group: “diracgrp”
Please note:
It is important that “nem” and “diracgrp” group also need to be added to the AD server and that nem is set as primary group for nemsecadm user and diracgrp for dirac user.
Install FOXMAN-UN:
a Verify the nemsecadm UID and nem GID are set in AD.
Execute the following command to verify nemsecadm is defined in AD:
getent passwd nemsecadm@EXAMPLE.COM
nemsecadm:x:796401107:796401113:nemsecadm:/opt/nem/nemsecadm:/bin/bash
or
getent passwd nemsecadm
nemsecadm:x:796401107:796401113:nemsecadm:/opt/nem/nemsecadm:/bin/bash
nemsecadm user UID 796401107, nem group GID 796401113
b Verify that linux password rules minlen and minclass in /etc/security/pwquality.conf are aligned to AD password rules
c Manually add to /etc/group the entry for the nem group with the GID proposed by AD,
e.g., nem:x:796401113:rabbitmq,nemsecadm
d Install FOXMAN-UN with the standard install script.
Enter m to modify the default configuration.
Press enter to accept the default Database name.
Insert the nemsecadm UID proposed by AD.
Insert the nem GID proposed by AD.
e.g., uid=796401107(nemsecadm) gid=796401113(nem)
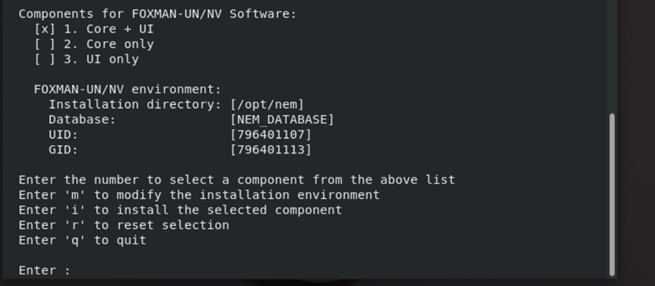
Enter i to install.
When requested to set up the nemsecadm password insert the one defined in AD
e Manually add to /etc/passwd the entry for the nemsecadm user with the UID/GID proposed by AD,
e.g., nemsecadm:x:796401107:796401113:NEM administrator:/opt/nem/nemsecadm:/bin/bash
PAM module integration:
In this section we describe the modification of /etc/pam.d/nem-auth.
Add the following line at beginning in nem-auth:
Auth [success=done auth_err=die default=ignore] pam_sss.so
The file content would then look like:
#%PAM-1.1
# NEM authenticaton
auth [success=done auth_err=die default=ignore] pam_sss.so
auth include system-auth
auth required pam_nologin.so
account required pam_unix.so
password include system-auth
session include system-auth
session required pam_limits.so
session optional pam_console.so
If OK, restart FOXMAN-UN.
Configuration of new operator users in the windows AD server:
This step needs to be repeated each time a new user is added to FOXMAN-UN.
A new used added to FOXMAN-UN needs to be added as well to the AD server.
Add each FOXMAN-UN user to AD with group nem.
On the Linux server, the user needs to be added to /etc/password with same groupid, uid as defined in AD with /bin/bash shell and without domain name.
Please note:
To prevent new users to get local access to the server via ssh, add the user(s) to the DenyUsers or AllowUsers of sshd via sshd_config. To prevent users from logging in through GDM, configure the “auth” section of /etc/pam.d/gd-password file as follows:
auth [success=done ignore=ignore default=bad] pam_selinux_permit.so
auth required pam_succeed_if.so user notin user1:user2 quiet
auth substack password-auth
auth optional pam_gnome_keyring.so
After making the above change, user1 and user2 will no longer be able to log in via GDM. Also see https://access.redhat.com/solutions/2839611, “How to disable User Authentication in GDM using PAM?” (subscriber-exclusive content; login required).
Result: FOXMAN-UN is integrated with AD.
Install DIRAC (optional)
a Verify the dirac UID and diracgrp GID are set in AD. To do so,
Execute the following command to verify dirac is defined in AD:
$ getent passwd dirac@EXAMPLE.COM
dirac:*:796401116:796401115:dirac:/opt/dirac/dirac:/bin/bash
or
$ getent passwd dirac
dirac:*:796401116:796401115:dirac:/opt/dirac/dirac:/bin/bash
dirac user UID 796401116, diracgrp group GID 796401115
b Manually add to /etc/group the entry for the dirac group with the GID proposed by AD, e.g., dirac:x:796401115:nemsecadm
c Manually add to /etc/passwd the entry for the dirac user with the UID/GID proposed by AD,
e.g., dirac:x:796401116:796401115:DIRAC administrator:/opt/dirac/dirac:/bin/bash
d Install DIRAC with the standard install script.
When requested to set up the dirac password, insert the one defined in AD.
Result: DIRAC is integrated with AD.
End of instruction